


Within the final publish, Teamwork Desk, we reduce out the entire elements to construct the central column and married them into pairs with every foot and a column leg matched up for grain. Now it’s time to assemble every pair, after which the complete pedestal.
To hitch the legs to the column sections I exploit a Festool Domino, however floating tenons or splines or dowels and even screws will do the job as you’ll see shortly. For irregular small elements I vise-mount the domino the wrong way up in a easy fixture [[ https://www.tailspintools.com/benchtop-domino]] and convey the work to the instrument.

I used a heavy tenon on the ankle the place there’s essentially the most depth and shorter twins under. Flipping the work makes the twins self-centering, however the single massive tenon is just not… Watch out to maintain your reference surfaces straight!
The shortest grain on each elements will probably be in compression on the ankle with the lengthy grain alongside the skin edges in stress on the heel.
Leg Glue Up
These are some awkwardly formed elements to connect collectively. After testing cauls with hooks, glue blocks and a few table-mounted wedgie-thingys, I arrived at a Okay.I.S.S. resolution: Screws as clamps.

The vertical edges of every leg will probably be invisible after closing meeting. Why not screws? After testing on scrap elements I drilled a tiny pilot gap within the column blanks centered on the dominos and perpendicular to the joint line. Comply with the pilot gap with an extended drill bit proper out via the again of the column.

Attempt to hold it on observe. Mark a line perpendicular to the drill line and chop in a ramp till you’re deep sufficient for lengthy screws to have good buy (these are 4”). Use a washer on the screw to keep away from splitting.
In case your bit wanders you may power it again now with a bit massive sufficient to let the screw threads slide via the column. Make a deep centerpunch on the leg clean the place you need the screw to go and dry assemble the joint with the dominos. Use the lengthy bit to drill the pilot gap within the leg… it ought to discover the centerpunch.

Watch out to not drill out via the underside of the leg… or don’t be… it is going to be hidden beneath ultimately. I used a soda straw as a depth cease.

Earlier than glueup, clear up the front-facing “ankle aspect” surfaces and add any deliberate edge remedies. In the event you caught to the reference surfaces the entire planing will probably be down-grain and downhill from the joint line.
I planed bevels that taper from 3/16” on the joint out to virtually zero on the toe and the highest of the column. Pre-assemble and ideal the matchups, then add some glue and drive the screw.

Get the screw virtually set and put a few clamps throughout the joint to maintain it from torqueing out of alignment. There’s no hurt in leaving screws in there if you wish to. For a lightweight desk like this a single screw with two dowels would in all probability do the job.
Column Meeting
With the leg assemblies glued up you may have choices to make. The primary is the ultimate top of the desk. If you understand the place it’ll stay, mock it as much as see the way it matches. Some double-stick tape will get you there. I lowered this one to suit subsequent to a chair, taking 1½” from the highest of every leg meeting on the chop noticed.

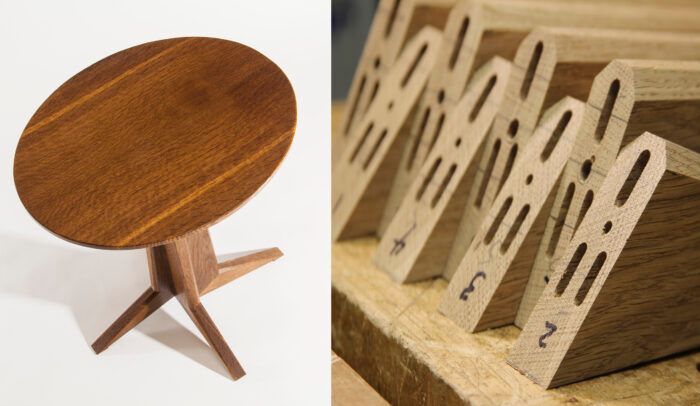
There are alternatives for methods to assemble the column, every with a unique look. Three of them are under. Bigger or smaller spacers, no spacers, and elements orientation all have an effect on the look. An oblong spacer might intensify the variations within the base. You’ll want to resolve now as a result of we’ll be chopping channels for the highest assist earlier than we glue up the bottom. I selected the far-left choice above with a 3/8” spacer.

I used the cutoffs to mark out crossing dados for the highest helps. Lay out the dados on the BOTTOM of the cutoffs that are shut in dimension to the highest of the tapered columns elements.

Use the cutoffs on a sled to set the reduce depths on the desk noticed. My cuts to every leg are equivalent and run in a circle across the heart. In the event you used an asymmetrical spacer they received’t be. Take your time marking cuts and waste… remembering that the offcuts’ format is upside-down. Free the waste on the bandsaw.

Pre-assemble once more and mark your elements for closing meeting. Now that the notches (which grow to be dados to carry the highest upon glueup) are reduce the elements are now not interchangeable. They should go collectively the identical means you marked and reduce the notches.

Mark every joint in a means you can’t mistake. I used tic marks in several coloured pencils throughout every. In case you are utilizing a middle spacer mark the opening all the way in which round with a black marker.
![]()
When chopping for dominos, I used a 3/8” thick spacer to chop the faces with the black heart marks. With the entire joinery cuts performed this can be a good time to do any sanding or different cleanup work earlier than meeting.

Discover the cutoffs you saved whenever you from tapered the columns and use them as cauls to connect up pairs with 1 quick and 1 lengthy leg. As soon as cured, assemble the pairs to finish the column.

Within the subsequent publish we’ll make prime helps and drawbore them to the column. Then we’ll make the highest and end up.
Join eletters right this moment and get the most recent strategies and how-to from Advantageous Woodworking, plus particular gives.
")

")


")
