


From FW#22–Could/June 1980
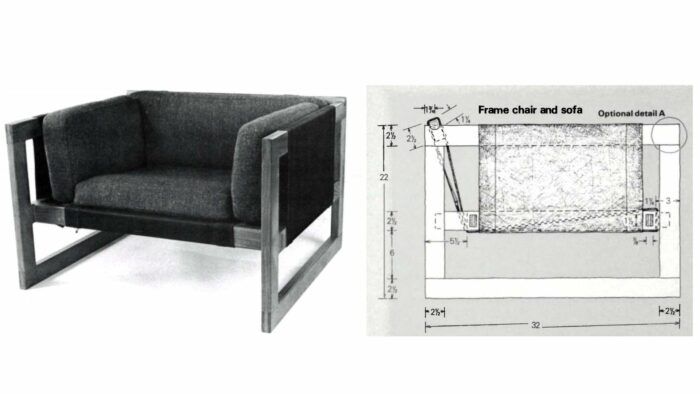
This chair and couch are two variations on one easy theme: a wooden body spanned by tensioned canvas that helps free cushions. The canvas is saved taut by nylon lacing operating via brass grommets. Each items are mild, simple to make, and economical.
I designed the chair as a follow challenge for apprentices of their first six weeks of coaching. It teaches the mortise-and-tenon in addition to bridle joints, and it may be created from a drawing with minimal supervision. Since little materials is concerned, a poorly lower joint could possibly be remodeled once more with out both the scholar or myself feeling badly concerning the waste.
Later I used the identical fundamental design for a small couch after which for a bigger one. The previous succeeded however the latter was a failure. Though amply robust to assist three adults, it regarded weak as a result of the tip frames have been too far aside. The one structural distinction between the couch and the chair is within the thickness of inventory—1-3/8 in. as a substitute of 1-1/4 in. That is as a lot for the sake of proportion as for power.
Sofas are cumbersome and awkward to maneuver, so I additionally made a knockdown model by substituting free wedges for the glued mortise-and-tenon joints. This element is proven at B within the drawing and can be utilized for both piece.
This design could be made in any straight-grained hardwood. Earlier than deciding on the wooden, take into account the way it will look towards each the canvas and the material chosen for the cushion covers. I like a black canvas as a result of it doesn’t present filth, goes with any wooden (besides walnut), and appears good with brass grommets and white lacing.

Building
Beginning with 6/4 inventory, lower out the items for the tip frames and rails. If you’re making the knockdown model, make sure you add 3 in. to 2 of the lengthy rails to make room for the mortises and wedges. Mill all these items all the way down to 1-3/8 in. if making the couch, 1-1/4 in. for the chair.
The subsequent step is to affix up the tip frames by bridle joints at every nook. Bridle joints are greatest lower on the desk noticed; a carbide blade helps guarantee accuracy and smoothness. If I have been making this chair by hand, I’d use a unique joint, a mitered dovetail, as a result of I don’t love to do issues by hand which might be higher carried out by machine and vice-versa. I’ll describe how you can make the bridle joint first, then the mitered dovetail.

After chopping the items to size, set a marking gauge to the width of the inventory plus 1/16 in. Mark out one of many pairs to be joined on all 4 faces of every piece. If you’re utilizing a desk noticed, there isn’t a must mark multiple pair as a result of noticed and fence settings will handle the remainder. Normal follow is to make the tenon two-fifths of the thickness of the inventory—about 1/2 in. for five/4 inventory.
Noticed the tenons. I lower the cheeks first, then the shoulders. In case you don’t have a ok blade for end cuts, mark all of the shoulders with a knife, noticed 1/16 in. in on the waste facet after which chisel to the road. The shoulder have to be left sq., not undercut, as a result of it reveals. Subsequent noticed the mortises. Because you’ll be holding the items vertically, you want a option to assist them in order that they don’t dangerously tip or wobble. A tenoning jig is a good suggestion.
The mortises ought to match the tenons snugly with none forcing.
You possibly can noticed the whole mortise, or simply the partitions. In case you go the latter route, take away the waste in between by drilling a single gap (midway from all sides) or with a coping noticed. Then with a chisel, clear up the tip grain to the gauge mark on the within of the mortise.
The mitered dovetail, the handmade various, is a one-pin affair that does the job of a bridle joint, solely extra elegantly. Start by marking all 4 surfaces of every pair to be joined (dotted traces within the drawing at A). Mark out the miter traces on all sides of each items with a knife, however don’t noticed them but. Subsequent, mark out the area for the tail on the horizontal piece (a) as proven. This may be sawn both on a desk noticed, with the blade angled, or by hand utilizing a tenon noticed. Minimize out the waste with a coping noticed and chisel to the road y-y working from each side. Lay piece a firmly on the tip of b and mark the pin with a scribe or thin-bladed knife. Mark out the opposite limits of the pin and noticed the cheeks. Bear in mind to cease the sawcut when near the miter line.
The final step is to noticed the miters on each items and trial-fit the joint. You need to noticed the miters a bit of to the waste facet of the road, push the joint collectively after which run a high-quality noticed into the joint, on each side, till the miter closes.
With the joints within the facet members lower, the center rail is subsequent mortised into the 2 verticals after which all 5 body items could be assembled and glued up. When gluing a bridle joint, make sure you put clamping stress (defending the work with pads) on the edges of the joint till the glue has set. When gluing a mitered dovetail, put glue on the miters in addition to on the pin and tail. Clamp calmly throughout the cheeks of the tail. Examine with a sq.. After the glue has set (however earlier than it’s bone laborious), flush off the surfaces with a pointy airplane.
Subsequent, lower the through-mortises for the 2 lengthy rails. Mark precisely on each side with a knife, drill out the waste, then chisel to the knife mark. The semicircular cutouts are greatest carried out by clamping the highest edges of the 2 frames collectively and drilling a single 1-1/4-in. gap. Bear in mind to make use of a backing piece to forestall splintering.
The perimeters of the frames and rails have to be rounded over. If they’re left sharp, the canvas will ultimately put on via on the corners. I exploit a router with a carbide roundover bit fitted with a bearing. It will also be carried out by hand, with a wooden file and sandpaper. All the perimeters are handled in the identical approach besides the place two horizontal rails meet. Right here they’re left sq..
Subsequent, the 4 items of the underframe are lower and joined. The brief items are stub-tenoned into the lengthy rails as a result of a through-mortise would weaken the construction. This meeting is then connected to the tip frames utilizing both a glued-and-wedged mortise-and-tenon joint or, for the knockdown alternative, a through-mortise and free wedge. In each instances the wedge is vertical, at proper angles to the grain.
When making a tapered mortise, it’s best to make the wedges first. Lay a wedge on the skin of the tenon and mark the slope with a pencil. Then, with a mortise gauge and a knife, mark the 2 mortise openings high and backside. A lot of the waste could be drilled out (working from each ends) and the rest cleaned out with a chisel. I all the time go away the wedges 1 in. overlong so when they’re tapped dwelling they are often marked, then eliminated for trimming. The highest of the wedge ought to challenge barely greater than the underside. In time they invariably get pushed decrease.
The highest rail, in the back of the chair, will not be fixed however is held in place by the strain of the canvas. It’s rounded on the higher facet and matches loosely into the half-rounds in every body. Its two ends are greatest sawn out sq. after which formed with a rasp or wooden file.
The canvas is wrapped across the accomplished body and laced throughout the again and beneath the seat. You will want 45 ft. of 1/4-in. lacing, double for the couch, which have to be nylon or an equal. Don’t use clothesline or sash wire. I exploit an 18-oz. handled chair duck, which is a moderately heavy materials for a home stitching machine, and you could wish to have the canvas made by a tent and awning producer, a sailmaker, or an upholsterer. The two-in. seams are sewn with the sting turned beneath 1/2 in. They have to be made precisely as within the drawings so solely the sleek facet of the seam reveals. The brass eyelets, or grommets, are simple to place in your self. You want about three dozen 1/2-in. grommets (5 dozen for the couch) and a 1/2-in. punch-and-die set.
Cushions
To make the cushions you want a chunk of medium-density polyurethane foam 4 in. thick, 1-in. Dacron wrapping, medium-weight unbleached muslin, a 26-in. zipper for every cushion, and material for the skin covers.

First make a full-size sample of every completely different form of cushion in heavy, brown wrapping paper. Switch the patterns to the froth utilizing a comfortable pencil or blue chalk. In case you don’t have a bandsaw, the best option to lower polyurethane is with a high-quality panel noticed or hacksaw. An electrical carving knife will work, too. Help the froth on the sting of a chunk of plywood, noticed with mild strokes alongside the traces, and preserve the airplane of the noticed vertical.
The Dacron batting provides the cushions some further bulk and makes them much less laborious—each on the seat and on the attention. They’re padded a bit of extra on one facet than on the opposite as follows: Utilizing the identical patterns, lower out with scissors one piece of batting for every cushion. Lay this on the facet of the froth, which, when in place, might be towards an individual sitting within the chair (away from the canvas). Subsequent wrap every cushion, together with the ends, as soon as round with the batting. Chances are you’ll wish to preserve this in place with a sprig glue (foam or material adhesive) whereas making the muslin undercovers. To cowl the ends of the froth, both lower the batting over broad and fold it over the ends, like wrapping a parcel, or lower separate items of batting and spray-glue them in place.
Undercovers
Muslin undercovers are important. With out them it’s virtually not possible to take away and exchange outer, or slip, covers, for cleansing. Inside and outer covers are made in the identical approach: two panels joined by a strip (known as boxing) that runs across the fringe of the cushion.
Lay the unique patterns on a chunk of newspaper after which, with a felt pen, draw a line round them. Draw one other line 1/2 in. outdoors the patterns and a 3rd one 1/2 in. outdoors that. Minimize across the outdoors line. Utilizing these new patterns, lower out two items of muslin for every cushion. Subsequent, lower the fieldings, strips 4 in. broad and a bit of longer than the perimeter of the cushion. They don’t need to be one piece.
If you’re an previous hand with a stitching machine, machine sew the covers instantly, stitching 1/2 in. from the sting of the fabric (the center line of your sample). That is greatest carried out by placing a chunk of tape as a information in your stitching machine 1/2 in. from the needle. Sew the boxing to at least one panel all the way in which round after which, ranging from one nook, sew the opposite panel. If you’re a novice, pin or hand-stitch (baste) the covers earlier than machining. Leaving one lengthy edge unsewn, flip the covers inside out and insert the wrapped foam. The free edge is turned beneath and blind-hemstitched by hand.
Cloth
As in selecting a wooden, sure standards apply when selecting material for the outer covers. Leaving apart issues of shade and sample, you will need to select a cloth that’s robust sufficient. It should not stretch in use—which implies a good weave— shrink when washed, or put on too rapidly. Consider the local weather, too. Wool is ok in Vermont, however it might be a poor selection for the warmth and humidity of a Washington summer time, the place linen or heavy cotton could be preferable. Do not forget that mild colours want cleansing extra typically, blues fade in brilliant daylight, and a few synthetics not solely can soften however are flammable. The chair would require 5 yd. of 30-in. to 36-in. materials, the couch 8 yd. In case you use 48-in. or 54-in. materials, the chair would require 4 yd. of fabric, the couch 6 yd. The undercovers would require roughly the identical quantity of muslin. Ensure that the fabric is preshrunk. If it isn’t, you will need to wash it as soon as to shrink it. Ironing makes the stitching simpler.

Outer covers
Taking the identical newspaper patterns that have been used for the muslin covers, lower (to the center line) all the way in which round. Then pin the patterns to the material and lower out the panels as earlier than, along with sufficient 4-in. strips for the boxing. The innermost line on the sample is now the one to stitch on.
The alert reader will discover that the muslin-covered cushions are ½ in. larger than the outer covers. Like placing a sausage in its pores and skin, this helps preserve the outer covers tight and free from wrinkles. Wrinkles within the muslin won’t present via—the muslin is just too skinny.
The interior and outer covers are made precisely the identical approach, the one complication being the zipper. This have to be put the place it gained’t present, and the perfect placement is indicated on the drawing. To put in the zipper, take a chunk of boxing 1 in. longer than the zipper and fold it in half lengthwise, making a crease. If it gained’t keep creased, iron it. Lay the zipper down on the crease in order that the zipper tooth are simply degree with the folded fringe of the boxing. Pin or tack it in place after which sew it utilizing the zipper foot of your stitching machine. Now take one other piece of 4-in. boxing, crease it lengthwise, and sew it to the opposite facet of the zipper. You need to now have a 4-in. strip of boxing, double thickness, with a zipper operating neatly up the center.
When stitching this piece of boxing to the facet panels, keep in mind to face the zipper in. Then, when the quilt is turned inside out, it is going to be on the correct facet. Knowledgeable upholsterer covers the 2 ends of the zipper by overlapping the adjoining boxing. Or, you possibly can merely be part of it with a neat seam.
It’s a good coverage to stitch the seams twice, as soon as alongside a line ½ in. from the sting and once more as close to to the sting as you possibly can handle. This prevents the fabric from unraveling on the seam whether it is roughly laundered.
This chair and couch have by no means been made in amount however the design might simply be tailored for manufacturing by machine. It’s because there isn’t a hand-shaping, boards would not have to be chosen for shade and grain, and many of the joints could be lower by machine. The design could possibly be additional simplified through the use of just one thickness of inventory (1-3/8 in.), which might lower the variety of separate elements in half. Bridle joints lend themselves to machine manufacturing, however I’d exchange the mortise-and-tenon joints with stub mortises utilizing Allen-head machine screws and T-nuts. The entire piece might then be knocked down and simply reassembled.
Join eletters as we speak and get the newest strategies and how-to from Fantastic Woodworking, plus particular provides.
")

")


")
