


Synopsis: A cockbead is a small molding with a totally rounded edge. On this article, Chuck Bender offers step-by-step directions for creating cockbeading and making use of it to the cutout apron of a William and Mary case piece. After being minimize, items of cockbeading are submerged in water with a little bit added glycerin to ehance their pliability. They’re then secured to the apron with disguise glue and rose-head nails. Some items are minimize to remaining dimensions earlier than being utilized, whereas others are minimize in place.

They are saying it’s the little issues in life that matter most. To me, that’s one other means of claiming life is all concerning the particulars. I take a look at furnishings the identical means—the main points make all of the distinction. These particulars could be within the type of a fastidiously positioned chamfer or quirk, or a fragile molding that highlights the architectural nature of a bit. In William and Mary furnishings, the main points typically take the type of a bent cockbead that follows the scrollwork cutouts of case sides and aprons. The extra consideration you pay to the small particulars all through the method, the higher your completed product will look. It’s these little particulars that take your piece from good to nice, from acceptable to masterpiece.
Furnishings of the William and Mary interval moved away from utilizing straight-grained boards for case development. As a substitute, it had a lighter, extra flamboyant look. Extremely figured veneers had been broadly used. As a result of the items had been lined in burl and crotch veneers, furnishings makers quickly found the necessity to defend the sides of the fragile veneer with a cockbead.
A cockbead is a small molding, roughly 1/8 in. thick, with the sting totally rounded over, forming a half-round. The half-round often initiatives barely past the floor of the half to which it’s utilized. On veneered drawer fronts, the cockbead is usually set right into a rabbet. When utilized to the apron or sides of a William and Mary case piece just like the one proven right here, the cockbead is utilized on to the cutout floor.
Create the molding first
Making a cockbead for a curved floor isn’t a lot completely different from creating one for a straight floor. I used a router bit to type the bullnose, or half-round edge, however you possibly can use a molding aircraft. If I’m solely making a small part of cockbeading, I would merely use a block aircraft and sandpaper.
For me, the method begins with materials 1/8 in. thicker than the wooden to which the cockbead will probably be connected. For those who’re attaching the molding to a case aspect that’s 7/8 in. thick, then the board for the cockbeading must be 1 in. thick. The board also needs to be at the least 50% longer than the longest piece of beading wanted. You want materials to carry onto when making the bends. And also you additionally want further size in case it splits on the nail(s) in the course of the bend. The additional size permits you to minimize the bead again and reinstall fairly than trashing the piece and beginning over.
 |
 |
As soon as the board is milled, go a hand aircraft over the sting to take away any machine marks. Usually I exploit my scrub aircraft on inventory I’m utilizing for curved cockbeading as a result of it offers the floor a texture that mimics what you discover on William and Mary furnishings. On interval beading, you typically see tearout and concave aircraft marks, just like what you see on inside surfaces of furnishings of the interval.
I exploit a Whiteside #3240 1/8-in. bead-cutting router bit arrange in a router desk to chop a quirk into the face of the board. Subsequent I head to the desk noticed and rip off the freshly made cockbead, then hand aircraft the sting of the board. I repeat these steps till I’ve at the least 30% extra cockbeading inventory than I feel I want.

Pliability is the important thing to success
With the cockbeading made, it’s time to make it supple so it should bend to the desire of the curves. Until you’re utilizing inexperienced wooden, it’s essential introduce some moisture to the beading. I submerge the strips in a big bucket or container crammed with heat water. I add a little bit glycerin to the water, roughly 2 oz. per gallon, for added flexibility. Usually I tie the beading into bundles, then weigh the bundles down within the container to maintain them totally submerged.
 |
 |
At a minimal, maintain the beading submerged in a single day, however strive to not maintain it within the water for greater than a day or so at a time. The concept is to melt the fibers with out creating materials that has expanded tremendously due to the added water. The very last thing you need is plentiful shrinkage after the beading has been utilized to the piece of furnishings. As soon as you may bend a bit past 90° by hand with out fracturing or breaking, you’re prepared to start.
Put together the glue and nails
Prior to installing the beading to the case, get the glue and the nails prepared. Usually I combine a batch of disguise glue a day upfront, then get it cooking within the pot a number of hours forward of set up to make sure that all of the crystals totally dissolve.

Traditionally, rose-head nails held the beading in place whereas the disguise glue dried. Copy nails are tremendous, however they could pull out of the work underneath the stress from the bent beading materials. I soak my replica rose-head nails in muriatic acid in a single day, then unfold them out on a flat floor to rust a little bit prior to make use of. The skinny coating of rust offers the nail shanks a bit extra chunk.


Create two workstations
To be environment friendly, arrange your work space with two stations. The reducing station ought to have the container with the beading nonetheless submerged within the water, a pointy chisel (wider is healthier), a paring block in the event you select to make use of one, or a backer board in the event you go freehand.
The applying station ought to have the glue pot, the piece to which you’ll apply the beading, a hammer, nails, a drill with the correct bit, and a warmth gun (already working and sizzling). I additionally embrace finish or diagonal cutters for nail elimination when all the things simply goes unsuitable. Additionally it is a good suggestion to have just a few clamps close by.
Begin with a miter
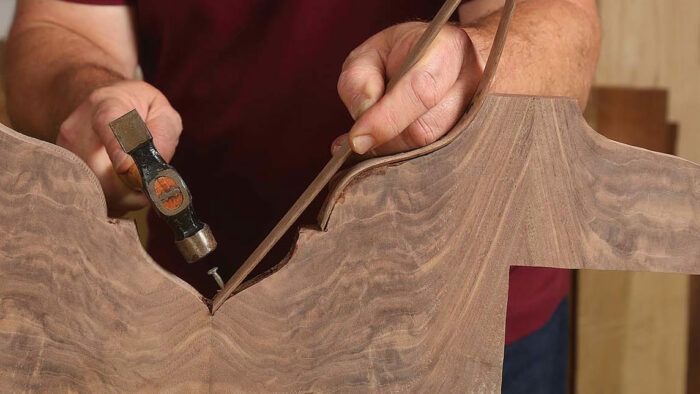
The beading goes on in sections, with the items left lengthy at first. The primary piece ought to go in an inside nook, the place miters meet.I attempt to plan the appliance of the beading in an order that enables me to run the beading lengthy and make remaining cuts after set up. Usually I begin on inside corners, the place miters meet. As a result of the beading has been softened, miters are simply minimize with a chisel, both freehand or with a paring block.

Take away a bit of beading materials from the water tub and minimize the primary miter with the chisel. Unfold glue on the curved floor of the case and a little bit on the again (sawn) aspect of the beading. Maintain the beading in place and drill the pilot gap about 1/2 in. away from the tip. Nail the beading in place.
|
|
|


Deliver on the warmth

At this level it’s best to have a bit of pliable beading with one nail holding it in place on the substrate you’re adhering to. Meaning it’s time to start out heating the beading and pressuring it into its curved place. In a single hand, maintain the warmth gun just a few inches from the beading. Hold it transferring, since you don’t wish to scorch or burn the wooden. Whereas making use of a good quantity of downward strain to the beading with the opposite hand, begin the bend. Interval items typically have way more nails within the beading than you’ll suppose needed, typically each 1/2 in. or so. I are usually a little bit extra reserved with my nails and to position them each 1 to 2 in., relying on how effectively the beading maintains contact with the substrate.
|
|
|


Once more, I are likely to let the beading run lengthy of the ends of the curved sections; if there’s a flat part, or fillet, dividing two curved sections, that’s often a necessity. If each ends of a bead will probably be mitered, I seldom minimize the piece to remaining size till after the glue has set. It’s at all times simpler, and extra correct, to chop the beading to remaining measurement afterward. If the tip of the beading is sq., positively let it run wild after which minimize it off flush after the glue has dried.

Subsequent items
Getting all of the beading in place is a strategic juggle. It’s supreme to let items run lengthy till after attachment. Some items will get mitered earlier than set up, and a few must be mitered as soon as they’re glued in place. For greatest outcomes, attempt to map out your order earlier than you begin attaching.
|
|
|


Pare the miter to the ultimate measurement, working from the skin (the beaded aspect) towards the within of the apron in case you will have any blowout.
 |
 |
Some items could be mitered on each ends earlier than putting in. Lower a miter on the tip of a stick of beading, then maintain it in place, mark the size, and miter the second finish. Add a little bit of sizzling disguise glue and put the beading in place, clamping it if needed.

It’s possible you’ll often discover it needed to place a clamp or two in spots the place gaps type. Ideally that is accomplished in the course of the bending course of, however you too can apply clamps after the beading has set. Use a warmth gun to heat the beading, which in flip will soften the glue. Add a clamp till you see a little bit squeeze-out, then let it set. Permit the finished beading to dry out for just a few days (and even longer) earlier than you do the ultimate floor prep and apply end.
-Chuck Bender is a woodworker and trainer in Jim Thorpe, Pa.
To view your complete article, please click on the View PDF button beneath.
High quality Woodworking Really useful Merchandise
Whiteside 9500 Stable Brass Router Inlay Router Bit Set
Set contains stable carbide down-cut spiral bit (for chip-free reducing), quick-change bushing, template information and full directions. Matches Porter-Cable, Black & Decker and any router with a Porter-Cable bushing adapter.

Bahco 6-Inch Card Scraper
The dimensions and thickness are what matter right here. A constant performer, this Bahco scraper is discovered in lots of outlets we go to.
Join eletters as we speak and get the most recent methods and how-to from High quality Woodworking, plus particular provides.
Obtain FREE PDF
once you enter your electronic mail tackle beneath.
")

")


")
