


Synopsis: Impressed by the bronze stenciling that’s a distinguishing characteristic of the Hitchcock chair, Aspen Golann appeared for a option to create her personal photos. She wanted to determine a option to execute the model with out utilizing the vintage stencils. Her resolution was the airbrush, which has allowed her so as to add painted particulars to wooden surfaces with a level of element, management, and creativity that’s unavailable with stencils. On this article, she supplies directions on gathering instruments and supplies, working the airbrush, making ready the floor with milk paint and shellac, and making a stencil in phases by reducing away sections of painter’s tape.
I cut up my time between portray and British and early American furnishings making. That mixture inevitably led me to the splashes of gold imagery on the omnipresent Hitchcock chair. You might not personal one or have appeared carefully at an unique, however there’s little doubt you’ve seen them in kitchens, thrift shops, or books. Bronze stenciling grew to become standard within the early nineteenth century, and whereas Connecticut producer Lambert Hitchcock was well-known for it, he didn’t invent the model. As a substitute, it began in Pennsylvania and New York with individuals who admired the filigree and inlay of imported French furnishings. Thrifty and ingenious U.S. cabinetmakers changed the costly steel inlay with bronze powder and gold leaf. In some methods it was a simplification, nevertheless it was nonetheless high-style craft, requiring huge ability and time.

Whereas I used to be impressed by the historical past, what I actually needed to do was develop my very own photos. To take action I had to determine easy methods to execute the model with out utilizing the vintage stencils Hitchcock was identified for. That’s how I landed on the airbrush. This little instrument unlocks a level of element, management, and creativity {that a} stencil can by no means rival. In time I honed my airbrushing abilities, and alongside the best way I developed an method that simplifies the method so fellow woodworkers can simply create gorgeous painted furnishings with out years of drawing apply. Whether or not you’re designing unique furnishings, repainting a set of chairs, or embellishing an instrument or a small field, my course of will allow you to take a inventive and up to date method to a standard American model.
The airbrush
 |
| A cheap nail-art instrument is a good way to begin experimenting with airbrushing with out having to decide to higher-end gear. The one on the left. from Ykall, is accessible on Amazon for $30. If you’re severe: this airbrush equipment, full with a compressor and all of the instruments wanted to get began, gives you limitless potentialities for making use of stenciled artwork to your furnishings items. Pictured on the proper is a equipment from Timbertech, that sells for $80 on Amazon. |
The very first thing you’ll must do is gather a small set of important instruments and supplies. The checklist clearly begins with an airbrush, which makes use of a compressor to push air and paint by way of a needle tip, permitting for plenty of positive traces and element.
 |
 |
| Pour in your paint. Airbrush paint is broadly obtainable in many sorts. For finest outcomes, it ought to have a consistency like milk. Add airbrush media or some type of thinner one drop at a time, checking the viscosity as you go. | |
Subsequent, you’ll want paint and an airbrush medium. You should buy airbrush paint in all kinds of colours from on-line retailers. Nonetheless, I discover that the majority paints, whether or not you purchase them combined otherwise you combine the pigments your self, are too thick for my airbrush, resulting in clumping or unintentional speckling. To get the proper viscosity, I add an airbrush medium one drop at a time till the paint is the consistency of milk. There are two sorts of airbrush media: thinners and circulate improvers. A thinner is used merely to skinny the paint, whereas a circulate improver could be helpful for already skinny paint, element work, and small needles. Movement improver has a drying retardant that retains the tip of the airbrush from drying out. For those who simply want a thinner, denatured alcohol, which many people have readily available already, works properly.
The airbrush is a fragile instrument and requires common cleansing. It’s simpler to scrub the comb earlier than the pigments dry contained in the barrel and tip, so I prepare to scrub earlier than I even begin portray.

The controls on the airbrush are easy: There’s a set off and a slide. The set off controls how a lot air passes by way of the nozzle, and the slide controls how open the nozzle is, which determines how positive your line is. Opening the slide just a bit bit produces a positive line, and pulling the slide again farther makes the road wider. Urgent down more durable on the set off makes the road darker. For one of these Hitchcock portray, I do quite a lot of my work with the set off half down (to set free only a little bit of paint) and the slide pulled all the best way again to get a large, even stroke. The airbrush lays down paint shortly, however preserve a gradual movement. Gingerly add a bit of little bit of paint at a time.
If the instrument begins to spit or clog throughout use, press the set off and pull the slide again till the clog clears and the comb sprays evenly once more. If this doesn’t work, briefly pour your paint right into a container and clear out the airbrush. Earlier than restarting, assess the consistency of your paint and contemplate thinning it a bit of.
Imagery
 |
 |
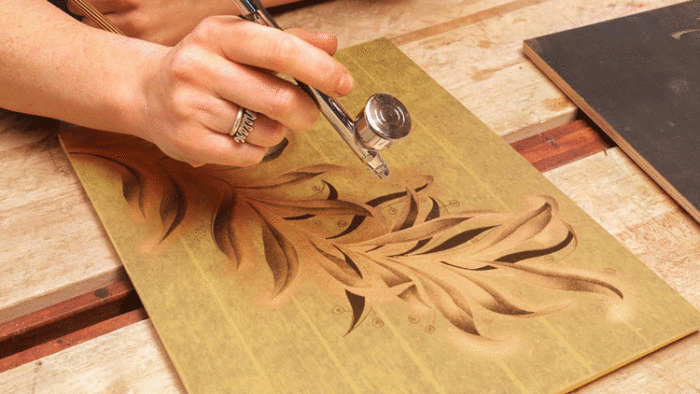
My technique begins with coats of milk paint after which shellac on the floor to be embellished. When these treatment I cowl the floor with painter’s tape and draw my design on the tape. I then reduce away elements of the drawing, eradicating the tape to yield a stencil.
 |
 |
There are some things that decide what kind of picture will make stencil. The Hitchcock model is usually monochromatic or grayscale, and perfect photos are excessive distinction, with sharp traces between gentle and darkish. So it’s essential to visualise or draw your picture in grayscale to see whether it is nonetheless straightforward to learn and retains its visible impression. The opposite trick to a practical, eye-catching picture is to decide on your lightest lights and darkest darks forward of time and ensure to not combine them or mix them collectively. Your eye perceives darkish areas as farther away or “decrease,” and lightweight areas, or highlights, it perceives as nearer to the attention or “larger.” Use your lights and darks deliberately to take care of the ability of the phantasm, and preserve them in thoughts all through the method. On this picture, the lightest lights are the stable gold sections within the foreground, and the darkest darks are the areas within the background, which stay the black milk paint of my base coat.
 |
 |
 |
| 1. Brightest Areas | 2. Midtones | 3. Shadows |
As you narrow away elements of the drawing, the little trimmings of sticky, discarded tape can get messy. (You might be pulling them out of your hair and off your bench for weeks.) To maintain your workspace clear, have a single place to place the sticky scraps. Some folks use a weeding cup to comprise the scraps; I typically simply stick them to a chunk of paper or the again of my hand.
One piece at a time

An important half on this course of is figuring out the order by which to take away the bits of tape. I typically sit down with a cup of espresso to suppose it by way of earlier than numbering the items, identical to a paint-by-numbers. The order will depend on the picture, however there’s a key to success: Start with any sections that shall be totally opaque. On this design, these are the stable gold sections within the foreground. Sort out these first; that method, any overspray from later sections received’t muddy the design. To restrict overspray, you should use cardstock or thick paper scraps to defend different sections of the picture.
 |
 |
With the totally opaque sections completed, I transfer on to the much less opaque areas, on this case the midground after which the background. I preserve working this manner till I attain the bottom degree of leaves. It’s essential to notice that this course of is completely additive, so as soon as a colour goes down, it’s there except you sand or scrape the painted part, reapply shellac, and begin once more. Gradual and regular is the secret. If you’re completed portray, wait till the paint is dry earlier than eradicating the remainder of the masks to disclose your work.
 |
 |
I hope you take pleasure in this course of and use it to discover new methods to decoration your designs. It took playfulness and innovation to develop these methods within the 1800s, and by honoring, critiquing, and evolving them we preserve them alive.

—Aspen Golann is an artist and furnishings maker in New Hampshire.
Aspen’s Webinar on Airbrushing could be discovered right here.
Positive Woodworking Beneficial Merchandise
Waterlox Authentic
Versatile wiping varnish is simple to use and nice for each satin and gloss finishes.
Liberon Metal Wool
Good for rubbing out a end for a low-luster sheen.

Drafting Instruments
Add a gap information to this equipment, and you will have the instruments you want to work out your designs with scale drawings.
Join eletters in the present day and get the newest methods and how-to from Positive Woodworking, plus particular affords.
Obtain FREE PDF
if you enter your e mail deal with beneath.
")

")


")
