


Synopsis: This text by furnishings maker Doug King particulars the design and building of a sculptural finish desk that includes a round glass high inside a cube-like body. King explains how the desk developed by means of a number of iterations, emphasizing curves, motion, and open construction inside a geometrical kind. He outlines step-by-step constructing strategies—each with and with out jigs and templates—together with shaping the legs and rails, assembling curved shelf slats, prefinishing elements, and crafting a exact high body to carry the glass insert.
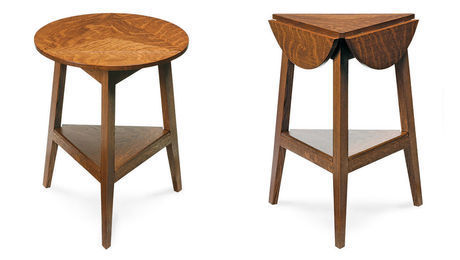
This small, curious finish desk is the product of a number of generations of tables I’ve constructed through the years. Each has developed aesthetically from the earlier one. The round piece of glass within the high attracts the attention, however as a complete the desk quantities to a dice. Inside that usually sq., static kind is sort of a little bit of motion, nevertheless. Delicate curves and shapes in addition to an open, sculptural construction have been my objectives.

I’ve numerous templates and jigs for the shapes and curves of the desk. I might write a complete separate piece on how one can make and use jigs and templates. The truth is, I did (see Grasp Class). However whereas I are likely to favor templates and jigs after I work and at all times use them after I make this desk, you can also make it with out the templates and jigs. It’s only a matter of tracing a sample, reducing near the road on the bandsaw, after which hand-shaping with a spokeshave, planes, recordsdata, and sandpaper. For this text, I’ll undergo the construct course of assuming you don’t have all of the templates and jigs, specializing in the order of operations and becoming all of the items to one another.
Sidestepping
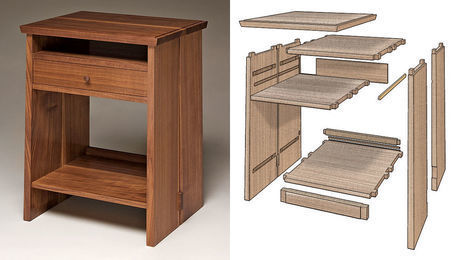
I start the development by constructing two facet assemblies, every of which consists of two legs with a low rail between them. All of the joinery on this mission is finished with #6 Festool Domino tenons.
Start with the legs. Maintain the underside and one lengthy fringe of the leg clean sq. to one another. Then hint the within curve of the leg onto the blanks and tough reduce near the road on the bandsaw. Whether or not you’re template-routing or shaping by hand, clear as much as the road. Then reduce the angle the place the rail will be a part of the leg. I create the angle by template-routing in a jig. You too can reduce that angle on the desk noticed with a miter gauge or a crosscut sled.
 The rails are a easy affair—only a block with angled ends. Make the rail a bit wider than wanted so its backside edge is pleased with the underside of the legs. It will likely be used as a reference floor all through the method earlier than being reduce to form on the finish.
As soon as the legs and rails are ready, reduce mortises in each utilizing the Festool Domino. Then glue up two separate facet assemblies.
After the glue dries, draw the higher curve on the rail and reduce it out on the bandsaw rigorously. Right here once more, I exploit a template and reduce the ultimate form on the router desk, however you need to use hand instruments to form the inside. (The identical goes for the outside shapes.) I draw, tough out, and template-rout it to its completed form. The outside curves of the legs get a roundover, and I do this on the router desk as nicely.
Subsequent, reduce the mortises for the shelf slats. I exploit a jig that gives a fence and format marks for the Domino. I reduce the mortises in a single facet meeting, registering off the underside fringe of the rail. Then I flip the jig over and use it to chop the mortises within the different facet meeting.
Registering the flat backside of the rail in opposition to the table-saw fence, reduce the facet assemblies to size. Lastly, reduce and form the news on the backside of the facet assemblies. This curve creates visible raise and lets the legs contact the ground at 4 factors slightly than having the entire size of the facet meeting sitting on the ground.
Slats
The desk has 5 shelf slats, three with convex curves on either side and two with concave curves on either side.

Start with the three convex slats. With the blanks nonetheless sq., reduce two Dominoes on every finish. Then hint the form on the blanks, reduce them near the road on the bandsaw, and refine the form with hand instruments or by template-routing. Repeat the method on the 2 concave slats.
Dry-fit the convex slats into one of many sides, one to both facet and one centered. These might be constants. You’ll match the concave slats between them, and any changes might be made to the 2 concave slats. Set the concave slats of their places with out Dominoes. Have a look at the spacing, and mark the place they must be trimmed for extra fascinating spacing between slats. Then use a spokeshave, block aircraft, or file to take away materials.
-Doug King is a customized furnishings maker in Missoula, Mont.
| From Advantageous Woodworking #321
To view all the article, please click on the View PDF button beneath. |
 |
Full dimension templates might be discovered right here. There’s a 1″ sq. within the nook for correct printing reference.

Join eletters at the moment and get the most recent strategies and how-to from Advantageous Woodworking, plus particular affords.
Obtain FREE PDF
whenever you enter your e mail deal with beneath.
")

")


")
