


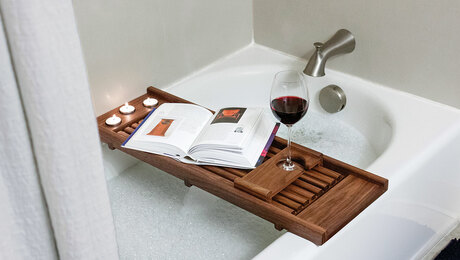
Synopsis: Consisting of a easy body and a single shelf, Leah Amick’s bath-towel rack is a straightforward undertaking that may be inbuilt a day or two. The entire body joinery is reduce on the desk noticed utilizing a dado set. The entrance is linked with lap joints, and the again is joined with rabbets strengthened with small pins. Keyhole slots within the again enable the unit to be hung securely and invisibly. Notches within the shelf maintain it in place towards the entrance of the rack with out the necessity for fasteners.
 I designed this piece after my husband and I bought our first house and realized that our visitor rest room lacked storage for towels and toiletries. With ground house at a premium, a wall-hung unit appeared like the suitable resolution. The rack holds rolled-up towels in two sizes, with room for toiletries and ornamental objects. I designed this piece after my husband and I bought our first house and realized that our visitor rest room lacked storage for towels and toiletries. With ground house at a premium, a wall-hung unit appeared like the suitable resolution. The rack holds rolled-up towels in two sizes, with room for toiletries and ornamental objects.
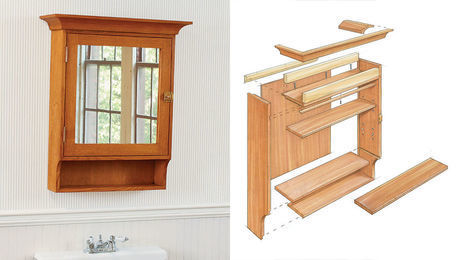
That is a simple undertaking that ought to take solely a day or two to construct, not counting ending. The entire body joinery is reduce on the desk noticed utilizing a dado set. The entrance of the body is joined with lap joints, and the joints on the again are easy rabbets, strengthened with dowels. And one of many again rails receives two keyhole slots for hanging the rack securely and invisibly. The shelf can also be notched with the dado set to maintain it in place towards the entrance of the rack, and no fasteners are wanted to maintain it secure. As well as, these shallow notches maintain the entrance edges of the body aligned correctly. I rounded the sides of the body and shelf to match the smooth aesthetic of the tub tray I wrote about in FWW #304. The wooden is identical additionally—walnut—however every other species will work. |
Lower the body joints
The body elements are all 3/4 in. thick, which makes milling simpler. The shelf is 1/2 in. thick, and you can also make it from one strong piece or glue it up from two or extra.
When slicing the body elements to width and size, I made a number of additional elements as backups in case I made a nasty joinery reduce. I additionally held on to the offcuts to assist me arrange joinery cuts.
|
|
|


Lap joints first—Begin by laying out the lap joints in pencil that will help you maintain observe of their orientation. The lap joints are basically giant rabbets which might be reduce on the desk noticed utilizing the dado set. Stack the dado blades somewhat underneath 3/4 in. extensive, after which set their slicing depth to about 3/16 in. to begin. I help the elements with my crosscut sled, clamping on a cease block to regulate the size of the rabbets, though a miter gauge might additionally work.Dial within the setup utilizing your offcuts, guaranteeing that the mating elements find yourself flush with one another. And make the cuts in a number of passes, creeping up on the suitable depth of reduce and the suitable stop-block place.
|
|
|


In case you lack a dado set, the lap joints will be reduce with a straight bit on the router desk, with a miter gauge or a sq. backer board maintaining the inventory sq. to the fence.

Dry-fit the lap joints earlier than transferring on, ensuring their mating surfaces are as near flush as potential. And depart the table-saw setup in place for the following steps.
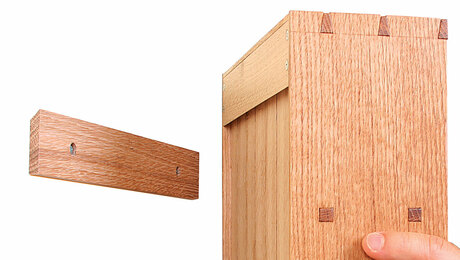
Rabbet the aspect rails—To attach the body elements in the back of the rack, I merely rabbeted the aspect rails to suit over the again rails. The center again rail has keyhole slots for attaching the rack to the wall, so it carries the burden of the rack and its contents. I went with the identical sled setup to chop these rabbets, utilizing a take a look at piece to dial within the cuts. After meeting, these rabbets are strengthened with small dowels, produced from the identical wooden species because the rack, so that they mix in.
Construct the body in phases
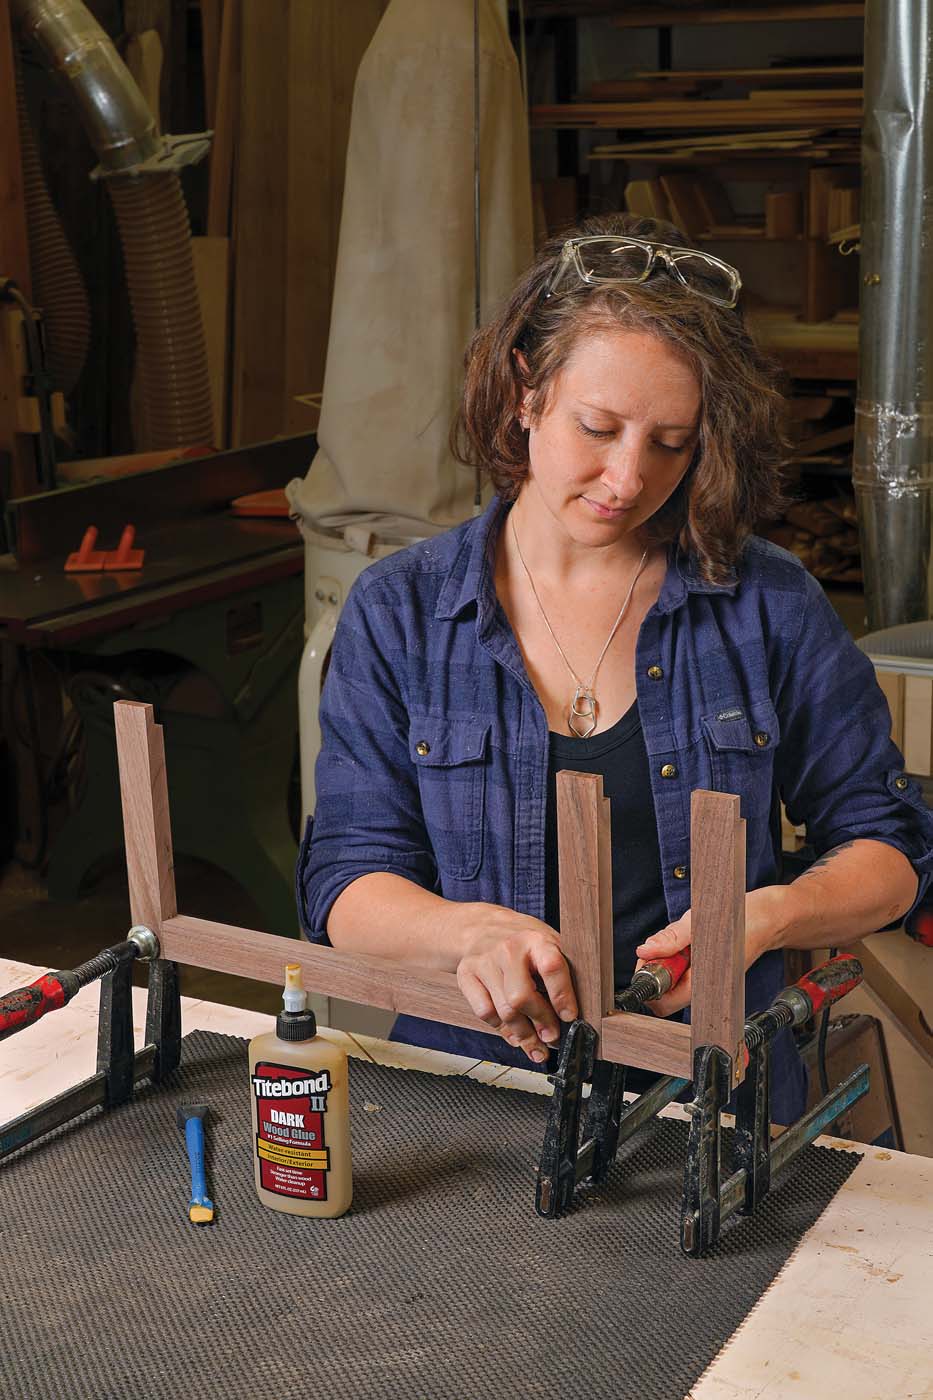
The body is assembled in a number of steps. First, the aspect rails are glued to the stiles. This creates two aspect assemblies which you can lay flat on the router desk for rounding the entrance edges of the body.
Begin with the lap joints—Dry-fit the joints to verify the aspect assemblies are mirror photos of one another and the lap joints come collectively sq. and flush. Then apply glue and clamps.

The totally rounded profile on the entrance edges is formed with two passes on the router desk, utilizing a 3/8-in. roundover bit. In case you’ve obtained your shelf prepared, use the identical router-table setup to spherical its entrance and aspect edges.
Rout the keyhole slots—The central again rail will get keyhole slots for attaching the rack to the wall. The rail isn’t lengthy sufficient for the keyhole slots to line up with two wall studs 16 in. aside, so I like to recommend utilizing drywall anchors to hold it. That can allow you to place the rack wherever you wish to.

Lower the keyhole slots on the router desk utilizing a 25/64-in. keyhole bit. Start by drilling 1/2-in.-dia. starter holes for the router-table operation. Use a Forstner bit, and set the depth for 1/2 in.—the identical depth because the keyhole slots to comply with.

Now arrange the router desk with the keyhole bit. In case your desk has a miter slot, use a miter gauge to help the rail. In any other case, you possibly can push it alongside the fence with a bit of plywood or MDF with a squared nook. In both setup, the top of the rail contacts the router-table fence, which locates the slot in a single path, and a cease block limits the ahead journey of the rail and due to this fact the size of the slot.
To arrange the reduce, begin with the router off, and drop the starter gap onto the keyhole bit. Then arrange the fence and cease block for the primary reduce.

Begin the reduce the identical method, with the router off and the bit within the starter gap. Then activate the router and push the rail ahead. When it hits the cease block, flip off the router, slide the rail backward, and carry it off the bit.

| Every keyhole slot requires a special setup. You’ll must reverse the router desk setup to chop the opposite keyhole slot. Simply ensure the slot ends on the identical level so the rack will cling stage on the wall.
Add the again rails—As soon as once more, begin with a dry-fit. Ensure the rail with the keyhole slots is the center one and that its keyhole slots are going through the suitable method up. When all of it appears good, glue and clamp the again rails into the rabbets within the aspect rails. To assist handle this tough meeting stage and make sure the body ended up sq., I clamped a plywood spacer panel between the stiles. |
 |
Add the shelf

After milling the shelf to dimension, spherical over its edges on the router desk. Then reduce the notches on its entrance edge that find the shelf on the rack. To put out the notches precisely, maintain the shelf towards the body and switch the situation of the body elements to the shelf. The stiles will have to be spaced evenly for this step, so maintain the plywood spacer in place from the sooner meeting step.
|
|
|


I reduce the notches with a dado set on the desk noticed, with the shelf standing on edge on my crosscut sled.
Reinforce the rabbets—Now you possibly can take away that spacer panel and carry the rack over to the drill press for boring the dowel holes. You possibly can drill them with a handheld drill as a substitute, however I just like the precision of the drill press. I additionally advocate utilizing a brad-point bit, as a typical twist drill will are inclined to wander.
Mark the opening places, and drill the 1/4-in. holes not less than 3/4 in. deep. If potential, use dowels produced from the identical species because the rack in order that they mix in, and ensure they match the holes properly earlier than you apply glue. If the match is simply too tight, you possibly can sand the dowels.
|
|
|


Lower the dowels a bit lengthy, and chamfer their tricks to make them simpler to insert. Then unfold a modest quantity of glue within the holes earlier than driving within the dowels.
I trimmed off the surplus with a flush-cut noticed after which sanded the surfaces flush.
End and cling the rack
As I did on the bathtub tray in FWW #304, I sanded the elements to 220 grit, elevating the grain earlier than the ultimate sandpaper move, and completed them with two coats of Osmo Polyx-Oil, a mix of oil and wax that resists water surprisingly nicely.
To hold the rack securely, I used drywall anchors, which include screws that match the keyholes completely. Slide the keyholes over the screws, add some good towels and toiletry objects, and the undertaking is finished.
I put in my bathtub rack 4 years in the past, and I proceed to obtain compliments on it. Individuals ask me the place I obtained it, and like each woodworker, I’m comfortable to inform them.
-Leah Okay.S. Amick is a furnishings maker and product designer in Portland, Ore.
Advantageous Woodworking Advisable Merchandise
Suizan Japanese Pull Noticed
A flexible noticed that can be utilized for something from kumiko to dovetails. Mike Pekovich recommends them as a woodworker’s first handsaw.
Join eletters right this moment and get the most recent strategies and how-to from Advantageous Woodworking, plus particular provides.
Obtain FREE PDF
while you enter your electronic mail handle beneath.
")

")


")
