


[Originally from FWW Issue #13]
Bowls could be turned from seasoned wooden, inexperienced wooden, or laminated wooden. The outcomes from seasoned or unseasoned inventory are comparable, however the bowls produced from laminated wooden are fairly totally different. I needed to show some bowls, however since I don’t have a chainsaw or a drying room, utilizing inexperienced wooden appeared past my functionality. And I couldn’t afford to buy a big slab of seasoned hardwood both. Due to this fact, I turned to creating bowls from glued-up wooden. After I started, I didn’t know what type my laminations would take; the laminated bowls I had seen didn’t appear particularly engaging. So I made a decision not to take a look at any how-to literature and simply strive it by myself. The 4 bowls proven listed below are the outcomes of my experiments.
If I may have turned bowls from strong inventory, I don’t know if I ever would have tried such a lamination. However now I’m hooked on the concept. The sphere of complicated laminations is new and unexplored. Haphazard gluing could be unattractive, however with some artistic considering, the laminations can improve the great thing about the wooden. Glue traces might not be fairly, however they’re no uglier than the mortar that holds bricks collectively. If a bricklayer makes a sublime archway, he should taper his bricks; to do s,o he will increase the mortar-to-brick ratio. The identical is true for the woodworker. If he needs to attain a bend or design by way of lamination, the glue-to-wood ratio will improve. Each instances are reputable makes use of of supplies, and neither ought to be criticized for its use of adhesives. The work ought to be judged by the completed product.

My first bowl began with a easy thought: I needed to alter the standard horizontal glue traces of a laminated bowl. I completed this with some dangerous end-grain gluing. I glued collectively items of cherry, oak, mahogany, and teak. This block was clamped to the miter gauge of the desk noticed for security and accuracy. Then two cautious 45° crosscuts prompted a 90° chunk (a proper triangular prism) to be launched from the top grain, as proven within the drawing.

This reduce needed to be rigorously carried out as a result of any unevenness would lead to a poor and doubtlessly weak glue line. The 90° should be exact too—it’s straightforward to verify with an correct strive sq.. From the opposite finish of the block, I reduce the identical form, solely right here the grain is at a forty five° angle to the hypotenuse as a substitute of perpendicular. This reduce, due to its size, should be carried out on the bandsaw. It is not going to be a glue floor, so its flatness is of no particular significance. This similar finish is then reduce sq. for clamping. Due to the top grain, I sized the surfaces with a liberal coat of plastic resin glue. After it soaked and dried a bit, I utilized some extra and clamped it. The clamping process could be very easy-two clamps will do the trick-then it’s on to the lathe.

Subsequent, I made a decision to go skinny sheets of mahogany by way of a laminated block of cherry wooden. On the desk noticed, I set the miter gauge and the noticed blade for a compound angle reduce. In between the 2 halves, I sandwiched mahogany veneer. After it dried, I repeated the method two extra instances. In the long run, every bit of mahogany intersected the opposite two, as proven within the sketch. When the clean was turned on the lathe, the mahogany grew to become hyperboloids. Probably the most fascinating components proved to be the intersections of those hyperbolas.

Gluing this bowl turned out to be tougher than I had anticipated. The angle cuts, underneath strain of clamping, prompted the 2 halves to slide aside. I solved this drawback with some awkward clamping from all six sides. The unorthodox cross grain gluing may result in the eventual destruction of the bowl. However the skinny veneers of mahogany won’t have the energy to interrupt the glue joint, simply as skinny layers of plywood survive their cross-grain gluing. Time will inform.

The gluing drawback I encountered within the earlier bowl gave me an thought for the following one. It additionally despatched me from the desk noticed to the bandsaw. Thus far, I used to be making straight cuts, and the lathe was altering them into curves. This time, I made a decision to chop a curve. I began with a block made from cherry, oak, mahogany, and walnut. By means of this, I reduce (vertically) a mild arc. In between this arc, I positioned skinny strips of walnut and cherry. The work was first clamped collectively dry to seek out the gaps. Then I eliminated excessive factors on the spindle sander.
The ultimate gluing was straightforward to do. The issue of slipping I had skilled with the earlier bowl was gone, as a result of the 2 arcs aligned themselves naturally. Bending wooden could be troublesome and time-consuming: The bending jig should be made to duplicate the curve, and steam is required to attain the bend. However right here the bending jig is not any additional work since it’s also the completed bowl, whereas the skinny laminations type simply to the arc with out steam.

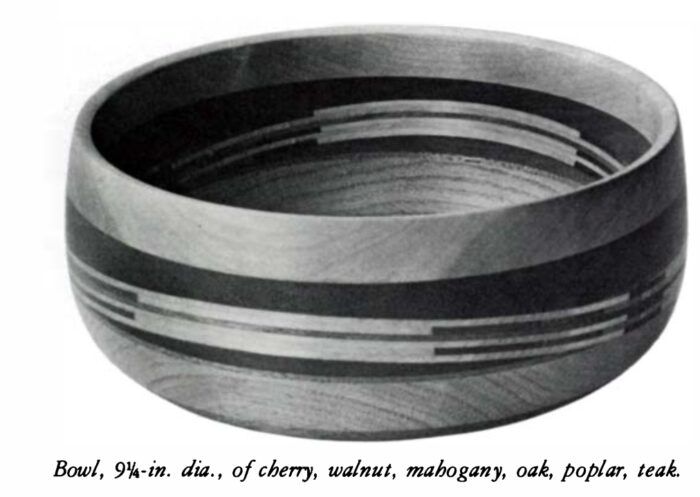
For the final bowl on this collection, I began with the identical block as earlier than. However this time, the arc reduce by way of the block went alongside the horizontal aircraft. The veneer to be laminated on this area additionally needed to be glued up. I glued strips of stake, poplar, oak, cherry, and walnut, all 3/4 in. by 2 in., collectively edge to edge. They had been resawn on the bandsaw with the fence set at 3/16 in. A pointy blade is required for this reduce, or else the blade will wander. The sheets had been handed by way of the planer to convey their thickness right down to ⅛ in. and to take away the noticed marks, thus making certain a great glue joint. They had been turned left over proper, and on the finish grain an inlay sample appeared.

Once more, this block was clamped dry to seek out the gaps that needed to be sanded away. As soon as glued and turned, the curved laminations within the heart of the bowl grew to become a steady wave across the bowl.
Fantastic Woodworking Really helpful Merchandise

CrushGrind Pepper Mill Mechanism
Matt Monaco designs his pepper mills to just accept the CrushGrind mill mechanism, which he likes as a result of it doesn’t require drilling by way of the highest of the mill’s cap and having {hardware} uncovered on prime.
Join eletters as we speak and get the newest methods and how-to from Fantastic Woodworking, plus particular presents.
Obtain FREE PDF
once you enter your e-mail tackle under.
")

")


")
