


Synopsis: Michael Pekovich enjoys initiatives that permit him to include enjoyable particulars, and this jewellery case has a number of: joints with proud dovetails; frame-and-panel building for the highest and backside; mitered trays, one among which contains a divider with a deal with wrapped in hemp twine; and a notch to accommodate the pull for the lid.
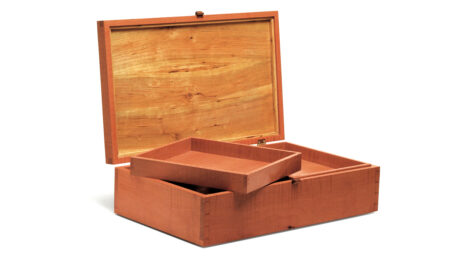
These days, I’ve discovered myself drawn towards smaller initiatives that incorporate enjoyable particulars, and a jewellery chest is the right place to get a bit artistic. This undertaking combines a dovetailed case with mitered trays and a frame-and-panel lid. It’s an easy construct with small touches that deliver it to life.

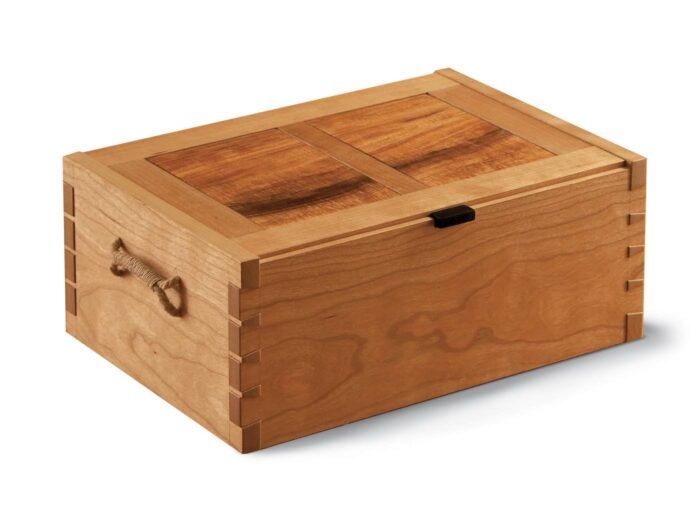
Though it’s maybe not evident at first look, there’s fairly a bit taking place on the high of the chest. Attaching a lid to a field is all the time an attention-grabbing problem, and there are lots of methods to go about it. Slightly than sitting on high of the case, the lid right here is nested between the edges, overlapping the again of the field and partially inset into the entrance. And its pull sits simply pleased with the entrance lip of the field. Whereas these options might escape discover at first, they mix for a cohesive look and one thing that’s just a bit sudden. I’ve used kumiko panels within the lid prior to now, this time I used strong panels for a extra understated look. Wrapped twine handles on the edges of the case permit for simple lifting of the chest. The inside trays characteristic a wrapped pull as effectively.
Dovetail the chest sides

Building begins by becoming a member of the case. The back and front have a gaggle of centered tails with a heavy inset from every edge. The large area on the high and backside permits you to run the case grooves and rabbets the size of the components. It additionally makes it simple to tear the again to closing width, simplifying the joinery tremendously.
Whereas the components will find yourself at numerous widths, it’s extra environment friendly to mill them to a constant width and take them to closing dimension after chopping the joinery. Begin by chopping the dovetails on the back and front of the case, then lower the grooves for the underside and the rabbet on the within fringe of the entrance for the lid. Scribe and lower the pins on the case sides. As soon as the joinery is full, rip the again to its closing top and trim the highest fringe of the entrance so the lid will sit proud. The ultimate process is to chop a notch centered alongside the highest fringe of the entrance for the pull. I discover it best to chop the notch first after which dimension the pull to the notch later.
Make the underside

Whereas I used a chunk of birch plywood lined with handmade paper as a backside for the trays, I believed {that a} frame-and-panel backside for the chest could be a pleasant contact. The joinery for it’s dealt with shortly on the desk noticed, and the ultimate result’s a steady and light-weight base for the chest. The components are 33⁄88 in. thick and joined with 11⁄88-in.-wide grooves, tenons, and tongues, which give loads of power. The underside panels are the identical thickness because the body, so you may lower the tenons and rebate the panels with the identical setting on the desk noticed. Construct the underside barely oversize, after which trim it for a exact match as soon as it’s assembled.

Assembling the case

A closing process previous to gluing up the case is to chop the hinge mortises alongside the highest fringe of the rear of the case. The again is recessed under the edges, which might make mortising troublesome after meeting. It’s additionally simpler to drill the edges for the twine handles at this level.
When surfacing the case components, add a light-weight chamfer to the ends of the pins and tails to make them pleasant to the contact. They received’t be planed flush after glue-up, so I attempt to reduce glue squeeze-out as a lot as doable. As well as, I wish to pre-finish the components with a coat of thinned shellac. It will permit for simpler glue removing later and can stop blotching ought to any glue contact the top grain of the pins or tails throughout meeting.
End the inside of the case components as effectively, however depart a strip of naked wooden alongside the underside half of the back and front in order that the higher tray helps will be glued to the within faces as soon as the case is collectively.
It takes only a few minutes to make a set of notched cauls for clamping. Taping the cauls in place alongside the dovetails will can help you focus clamping strain straight over the joint, stopping doable bowed sides and serving to to make sure a sq. glue-up.
To view your complete article, please click on the View PDF button under.
Join eletters in the present day and get the newest strategies and how-to from Effective Woodworking, plus particular affords.
Obtain FREE PDF
while you enter your e-mail deal with under.
")

")


")
