


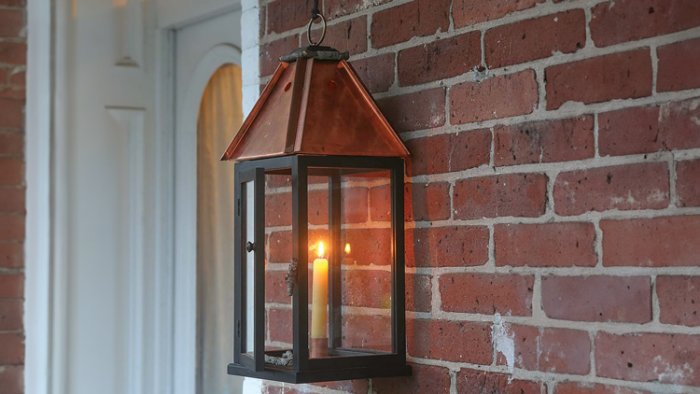
In 2017 I used to be invited to be a part of a present with The Trustees of Reservations and the North Bennet Road Faculty. 13 NBSS graduates had been invited to make a chunk impressed by one from The Trustees’ assortment. The piece I selected was a Nineteen Thirties desk made solely of twigs; it got here from a camp that was on the Lyman Reserve in Massachusetts. Because the desk was a part of a camp and the lantern is the North Bennet Road image, making a lantern appeared acceptable. This piece has mortise-and-tenon case building with glass panels and an inset door. The highest is manufactured from bent copper, and the case sits on a base that has a dovetail slide for the candle.

Begin the case joinery with grooves
 |
 |
I start by slicing a groove within the posts and rails on the router desk utilizing a straight bit. The groove can be run on the sides of the posts and rails that may maintain glass. The again posts get two grooves, as they may maintain two panes, however the entrance posts solely get one groove.
 |
 |
This groove will finally grow to be a rabbet (to carry the glass and stops). I run a groove first so there may be much less wooden to take away when making the rabbet. By doing the groove first on the case posts, I don’t have to boost the router bit as excessive when plunging, which I really feel is a secure method to carry out that operation.
Mortises on the router desk, tenons on the desk noticed
Except for the entrance posts, the top of every submit will get a mortise. (There is no such thing as a rail between the underside entrance posts, so that they don’t get mortised.) By operating the grooves first, I can use the identical setting on the router desk to chop all of the mortises within the posts. I set stops on the router desk to chop the mortises so I can plunge and push to a cease.

Subsequent, on the desk noticed, I reduce the tenons on every finish of the rails and match every tenon to a mortise.
Convert grooves to rabbets
As soon as all of the grooves, mortises, and tenons are reduce, I convert the grooves to rabbets on the router desk. It is a plunge and push to the cease reduce on the router desk, as a result of I don’t need to reduce the place the mortises are. By operating the grooves first, I don’t have to boost the cutter as excessive after I’m slicing the rabbets. This helps when plunging and pushing to a cease. To make these cuts, I exploit a straight bit and an auxiliary fence. Lastly, I exploit a marking gauge and chisel to take away the remainder of the rabbets by hand.
Glue the posts to the rails

A typical case has 4 sides; nevertheless, this case has three sides and a hinged door. I assemble the case in levels. I glue up one aspect, then the other aspect. As soon as these assemblies are dry, I connect them to one another on the again by gluing a high and backside rail to them.

On the similar time, on the entrance, I glue a high rail between the edges and add a spacer piece on the backside of the entrance part. The spacer piece makes positive the back and front are sq.. The spacer is milled with the rails and can have shoulders reduce on every finish utilizing the identical setting because the tenons.

Make and assemble the door
The inset glass door has offset shoulders. On the router desk once more, I reduce mortises within the stiles earlier than shifting to the desk noticed to run a rabbet on the rails and stiles. The rabbet holds the glass and wood stops.
I run the rabbet in a spacer block on the similar setting because the rabbet on the grooves and the stiles. Then I exploit the spacer block to do the offset shoulders on the desk noticed in order that they end up completely.
With the rabbet within the spacer, I reduce the offset shoulders with a dado set on the desk noticed utilizing the spacer clamped to the rip fence, first with the rabbet not partaking the rail after which flipped so the rail runs towards the rabbet to create the offset. As soon as the joinery is reduce, I glue the rail and stiles collectively. After that meeting dries, it’s time to deal with hinging the door to the case.
I reduce the hinge mortises on the door and case by hand utilizing a marking knife, marking gauge, and chisels. I reduce the mortises on the door first and set the hinges on the door. Then I place the door onto the case and switch the position of the hinges. As soon as the hinges are set, I hand aircraft the door to have a constant match and reveal contained in the case. This requires taking the hinges on and off the door just a few occasions. Because the case is stained black, I blacken the hinges utilizing Tremendous Blue.
A base with a slider

The bottom of the lantern is a strong piece of wooden that overhangs the case on all sides. It’s hooked up to the case with sloppy screw slots to permit for enlargement and contraction.
 |
 |
For simpler entry to the candle holder, I add a dovetailed sliding element to the underside utilizing a dovetail router bit and a handheld router to take away the wooden. I exploit the identical router bit within the router desk to make the strong dovetail slide. Later I’ll connect a twig pull to the dovetail slide, which can even function a cease for the door.
End first
The case is mahogany, comprised of scraps from one other job. It will possibly simply be left naked, however I resolve to stain it with black leather-based polish. I discover the mahogany grain and pore construction lends itself effectively to being stained with black polish. The end is Normal Finishes Arm-R-Seal.
A body for the roof

For the roof, I begin by making a sturdy body for the copper to be hooked up to. The body joinery is a bridle joint. The underside of the body is not going to be seen, and I bevel all 4 sides on the desk noticed to create the angle I need for the highest.

I reduce the joinery on the desk noticed utilizing a dado set. To chop the mortises, I exploit a hand screw that rides on the rip fence whereas holding the brief piece upright. A feather board retains the piece tight towards the fence. (You additionally may use an over-the-fence tenoning fixture.) The tenons are reduce mendacity face down on the desk noticed.
The copper topper
 |
 |
The 4 copper panels get reduce to form, wrapped across the backside of the body, and hooked up with screws. I define the template onto the copper with a knife after which reduce out the shapes on the bandsaw. Copper may be very delicate and may be reduce with an ordinary blade. I exploit a general-purpose 4–5-tpi blade, being positive to put on a respirator and to hoover up any steel particles left behind.
 |
 |
After slicing the copper to the sample, I bend the copper on a shopmade brake manufactured from plywood and hinges. I exploit a knife to attain the copper anyplace I can be folding. I line up the fold line on the copper with the seam within the brake, after which I clamp the copper in place and clamp the brake to the bench. I fold the brake at its hinges, which bends the copper previous 90°.

After eradicating the copper from the brake, I put the bent edge in my vise with a chunk of plywood. The plywood is barely decrease than the copper, and it helps to pinpoint the strain on the copper after I flip the deal with of my vise to bend the copper flat again on itself. Subsequent, I put this folded edge again within the brake and bend it within the brake once more. I don’t put the second fold again within the vise to fold it flat.
 |
 |
There are two tabs per panel, one on the high and one on the backside. As a result of it’s a straightforward 90° fold, I merely rating the fold line on the tabs, set them in my bench vise with the rating line on the high of the vise, tighten the vise, and fold the tabs.

On the drill press with a Forstner bit, I drill one gap in every copper panel to create air vents for the candle. The panels are hooked up to the underside of the body with screws. I exploit #4 by 3/4-in. panhead screws so I don’t need to countersink into the copper. The screws are pushed close to the sting of the copper, thus permitting the copper to nonetheless sit flush on the case.
Roof items are gathered collectively
Two sq. wood items (an ornamental high block and a assist block that sits contained in the roof on the high) maintain the copper tabs on the high of the roof collectively. I discover the middle of each items by marking an X. I drill holes within the ornamental high piece for the steel hanging ring and nut.
|
|
|


With blue tape I mark the entrance fringe of the 2 items of strong wooden and the entrance face of the copper. This enables me to all the time reference the entrance on all items.
First, I line up the entrance of the inside block and the entrance of the roof and drill by means of the copper tabs and into the underside inside block. I place the inside block on high of a supporting block of wooden that’s the similar peak because the copper roof. Then I place the roof on high of the inside block, ensuring the middle of the assist block is in the midst of the copper tabs. I drill by means of every copper tab and into the highest of the inside block. I take away the inside block and proceed drilling holes by means of it. Then I place screws by means of the underside of the inside block, leaving them barely protruding.
To switch the placement of the screws to the ornamental high block, I put the inside block again below the tabs and have the screws protrude out of the holes within the copper. I place the ornamental high over the copper tabs and press firmly into the protruding screws to go away an impression. Utilizing these marks, I drill holes into the underside of the ornamental high. I connect the steel hanging ring into the wood high, place the ornamental high again on the copper tabs, and screw by means of the underside of the inside block by means of the tabs after which into the underside of the ornamental wooden topper.

Set up the glass

As soon as the copper high is assembled, I mark and drill the case for the three screws, one on both sides and the again, that maintain the roof to the case. Nevertheless, the roof isn’t hooked up to the case till the glass is in place. I want to have the ability to maneuver with out the roof to put in all of the glass.
With a countersink bit, I drill below the highest rails on both sides and the again of the case. The screws that connect the copper high to the case undergo the highest rails and get lined by the stops. I set up the glass earlier than I connect the roof, however I tack in these final two stops after the roof is screwed in place. I place the copper high the wrong way up, with the case additionally the wrong way up and centered on the roof, after which place an axe into the screw holes to mark the place to drill into the copper high. I drill holes into the copper roof for the screws.

The glass is held in place with skinny wood miter strips. I miter every of these stops utilizing a forty five° sled on the desk noticed, and I connect the stops to the case aspect and door body with a pin nailer.
When putting in the glass, I begin with the pane that goes into the again of the case. I set the glass behind the case after which put within the stops. I exploit 1/2-in. 23-gauge pins to safe the stops to the case, with three pins within the aspect stops and two within the high and backside. After the again glass is in, I set up the glass on both sides of the case. (My pin nailer is simply sufficiently small to slot in the case.) I set up the glass within the door earlier than my ultimate set up of the door to the case.
The case will get a roof and a few ultimate touches

It’s lastly time to safe the roof to the case. After putting the copper high on the case, taking care to not scratch or break the glass, I screw the 2 items collectively by hand. The screws have to be fully countersunk or the ultimate three stops is not going to match correctly. I safe the final three stops in place.
|
|
|


To carry the candle, I nail a copper candle holder to the slide. My good friend Nicholas Ventola made the candle holder proven right here by soldering a chunk of copper pipe to a chunk of copper. (I may even have used a copper pipe cap for plumbing or bought the same copper candle holder from The Floral Society.) I additionally add the twig that serves because the pull for the slide in addition to the door cease. Then I connect a knob to drag the door open and a twig for a door latch.
Ellen Kaspern is a college member within the cupboard and furnishings making program on the North Bennet Road Faculty in Boston.
High quality Woodworking Really helpful Merchandise
Suizan Japanese Pull Noticed
A flexible noticed that can be utilized for something from kumiko to dovetails. Mike Pekovich recommends them as a woodworker’s first handsaw.
Join eletters right now and get the newest methods and how-to from High quality Woodworking, plus particular presents.
Obtain FREE PDF
while you enter your e mail tackle beneath.
")

")


")
