


The standard chessboard is an attractive venture for woodworkers of all ability ranges. You possibly can choose nearly any approach you wish to study or enhance and make use of it in constructing a chessboard with out spending exorbitant quantities of money on supplies. Are you a brand new woodworker who must follow correct machining expertise and glue-ups? Are you a seasoned woodworker craving to enhance your casework expertise? Make a chessboard with space for storing! Or possibly you’ve got that one stick of curly maple that’s simply too lovely to toss within the burn bin however isn’t fairly sufficiently big for any of the initiatives you usually deal with. Guess what? You want lower than 2 bd. ft. of fabric to make a easy chessboard. So pull that stick from the dusty field of sacred offcuts, get a pointy rip blade within the desk noticed, and invite over that one good friend who takes chess means too significantly—as a result of we’re about to make a implausible little chessboard and storage field.

This explicit chessboard employs solid-wood building, so contemplating wooden motion is essential. Inside just some years, a 16-in.-wide board will blow aside any field or cupboard that makes an attempt to include it; a strong maple board that large can transfer as much as 5/16 in. between the moist and dry seasons! Past cautious consideration of how the fabric strikes, I’ll present you what I wish to name the poor man’s compound miter, creating a geometrical base that performs properly with the sample on the board itself.
The supplies
Making a chessboard high is an train in small-scale manufacturing. For those who’re new to woodworking, that is actually the place you wish to focus your consideration. Correct milling, jig making, and machine setup are essential to your success right here, so take your time and work rigorously.
Let’s begin with materials choice. I selected to make use of curly maple and quartersawn walnut. Certain, these things ain’t low cost, however I’m not utilizing an entire lot of it. And I’m not simply utilizing fancy woods for the sake of being fancy. The ripples within the figured maple create a very fascinating phantasm: It appears at first look that the grain strains are working perpendicular to at least one one other. To the untrained eye this may not imply a lot, however I’ve had quite a few seasoned woodworkers ask me if I’m apprehensive it’s going to pull itself aside by way of wooden motion. They finally understand that it’s solely the determine they’re seeing. The boards are all glued in line, and wooden motion is accounted for. It’s a enjoyable little bit of trickery to make use of. That mentioned, plain flatsawn maple will do exactly advantageous in case you’re on a finances.
Board building: First lamination
I end my board at 5/8 in. thick, however to start out I mill the inventory right down to round 3/4 in. Keep in mind that I’ve a 22-in. planer, so planing this right down to closing thickness after gluing up isn’t any drawback for me. Nevertheless, in case you have a 13-in. planer and have to complete this with a hand airplane or random-orbit sander, think about taking your boards right down to 11/16 in. so there may be much less be just right for you down the street. Working with thinner inventory simply means you’ll have to be extra conscious through the glue-ups.

After thicknessing, I chop my boards to round 20 in. lengthy after which take them to the desk noticed. That is the place the primary important measurement comes into play. Set the fence rigorously to 2 in., and rip 4 strips of walnut and 4 strips of maple. Make sure you have a very good, sharp blade, as any blade deflection or burn will present by way of on the ultimate piece. Attempt to go away the noticed arrange in case you can; it’s going to make life a lot simpler down the street. With the strips ripped to closing width, lay them up in an alternating sample and edge-glue them. I like to make use of Titebond III right here, as there are a number of strips and the additional open time of TB3 is useful for alignment functions, although it’s not important. Preserve the strips flat, and use cauls if needed.

Board building: Second lamination


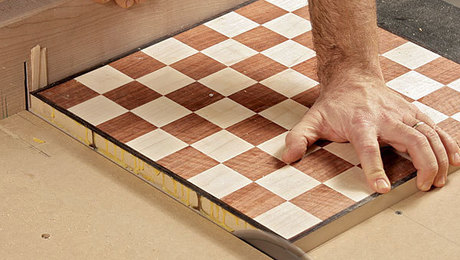
As soon as the primary lamination is dry (after about an hour), take it out of the clamps and verify it for flat. In case your glue-up was correct, you may scrape off any extra glue and go proper to the desk noticed. If there may be substantial offset between strips, you will have at hand airplane it flat after which run it by way of the planer to skim off the highest and create a flat floor.

Return to the desk noticed and, utilizing a crosscut sled, reduce throughout the grain to sq. up one facet. Take away the sled, place the lamination towards the fence, and reduce strips to the identical 2-in. width. Place the strips off to the facet, protecting them so as.

With the strips reduce and dry-assembled, raise each different strip out of the meeting and rotate them finish for finish, creating the chessboard sample. Take care to line up the seams; in any other case your chessboard will look extra like an M. C. Escher drawing than a recreation board. Take your time with the glue-up and guarantee it’s flat. Once more, use cauls if needed. Since you are gluing up finish grain on this step, think about using Titebond Fast and Thick. TB3 may also work simply advantageous in case you seal the pores first. When you don’t see end-grain to end-grain glue-ups on a regular basis, they’re a method that can be utilized efficiently in non-load-bearing circumstances like this. Nevertheless, if it lets you sleep higher at night time, be at liberty to make use of biscuits or a number of Dominoes to bolster the joint.

As soon as the glue is dry, take away the clamps, scrape any extra glue from the surfaces, and go straight to the planer. You can also do that with a hand airplane or belt sander in case your planer isn’t large sufficient; it’s simply slower than molasses on a winter day. Take away simply sufficient materials from the meeting to get a flat face, then flip the board over and machine the opposite facet to closing thickness.
At this level, if you would like simply the chessboard, be at liberty to bevel the perimeters, throw some end on it, and name it a day. However I’m not going to use end now, as I’m not finished simply but. No, I’m making a field that can maintain my chess items and can act as a sublime pedestal upon which I can show this cornucopia of figured-maple goodness.
 |
 |
| As soon as the checkered glue-up is dry, make a skimming crosscut to sq. up two sides. | Ever so barely rip the opposite two sides to sq. up the complete board. |
Field building
I choose a darker wooden for a base, as darkish colours have extra visible weight to them, grounding the article and making no matter sits atop really feel a bit extra essential. Consequently, I’ll use extra of the identical straight-grained walnut that I used on the highest. The joinery is miters, the underside is trapped in a groove, and a middle divider creates separate compartments for the items.

It’s the tapered components that set this field aside. The poor man’s compound miter is nothing greater than a regular miter with a taper on one face. This provides all of the visible attraction of a compound angle with out all of the complications related to it.
It’s fully pointless to taper the partitions of this field. If that step is intimidating to you, ignore this part and make a easy sq. field utilizing straight miters with splines, or dovetails, and even mortise and tenons. Nevertheless, I believe a slight taper offers visible curiosity to an in any other case plain base.
Groovin’
Begin with chopping the groove for the underside. Rip the primary reduce of the grooves on all 4 items, transfer the fence over 1/8 in., and rip once more, making a 1/4-in. by 5/16-in. groove. It’s also possible to do that with a dado stack, however for easy grooves like this I most frequently simply take two passes with a regular blade. It would go away a V-shaped backside, however your groove might be trapped in a miter, so nobody will ever know however you and me and everybody else who reads this text.
Dadoes cease within the grooves
For the subsequent little bit of joinery, I’ll reduce a dado on the within face of two of the field sides. The dadoes will maintain the divider that separates the darkish and lightweight chess items throughout storage. For a easy dado like this, I exploit a scrap piece of wooden as a fence, a sq., and a few double-stick tape—primary stuff, however there is no such thing as a purpose to overcomplicate such a easy course of.

To begin, double-stick the pair of field sides right down to your work floor, with the underside edges touching each other. Be sure the perimeters are completely aligned; in the event that they aren’t, your dadoes gained’t be both. Subsequent, draw a centerline. Then mark the offset from the middle of your trim router to the sting of its base, mark your self a line, and fix your makeshift fence to your workpieces utilizing a sq. and a few double-stick tape. Rout from the surface (high) of your workpiece towards the groove (backside), stopping if you pierce into the groove. Flip off the router, reset on the opposite piece, and repeat the identical operation.
Tapers and miters
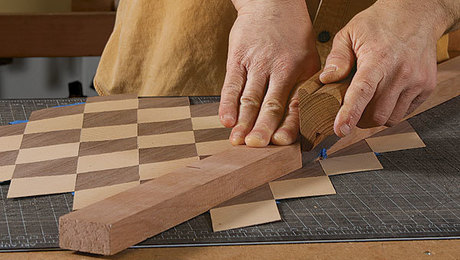
To make a quite simple tapering sled for the planer, seize some scrap 3/4-in. MDF and a small strip of wooden. Set your noticed to about 5° and rip a strip that’s 3/8 in. at its thickest and 22 in. lengthy. Glue the strip on one facet of your MDF. You’ve gotten simply made a tapering sled. I add one other registration strip on the highest and in addition somewhat sandpaper to forestall my items from slipping.

I exploit this sled within the planer with my walnut sides on it to airplane them to a taper throughout their width. After planing, mark the tapered face of the items in order that if you reduce the miters you might be all the time registering with the flat, grooved and dadoed facet right down to hold your joinery sq.. Lastly, reduce the miters utilizing a crosscut sled with a cease and the table-saw blade set to 45°.
A divider and backside spherical out the development
To make the divider, merely mill one other piece of walnut and, with a dado stack on the desk noticed, reduce the tenons on the ends. For the underside, given its massive dimension, I sometimes use a dimensionally secure sheet good similar to plywood. For those who use strong wooden for the underside, you’ll have to account for at the least 5/16 in. of wooden motion. There’s completely room to try this. Nevertheless, if like me you’re going to line the within of the field with suede, there is no such thing as a profit to utilizing strong wooden.

Utilizing a 1/2-in.-thick piece of plywood (or strong wooden), reduce the underside piece sq.. Then, utilizing a dado stack on the desk noticed, reduce a rabbet across the perimeter to create a tongue on all 4 sides. Test the match on the grooves and skim off one other go if wanted. Be conscious that your backside might be thicker if you connect your suede liner, so you’ll want to account for that when chopping your groove.
Suede liner
 |
 |
The rabbeted plywood backside makes a very good template to dimension and reduce the suede. Putting the suede beneath the template and urgent firmly, use a pointy knife to chop the suede a bit oversize. With a small chip brush or flux brush, unfold a skinny layer of yellow glue on the field backside. Rigorously glue the suede in place, and press it clean with a brayer. As soon as the glue is dry, reduce the suede to precise dimension with the knife.
 |
 |
Floor prep, glue-up, and liners

With the elements reduce and joinery finished, it’s nearly time for glue-up. However earlier than you go wherever close to a glue bottle, dry-fit all the pieces to verify alignment is sweet and the items match collectively cleanly. If that’s the case, take a number of passes with a hand airplane on the interior partitions of the field and hand-sand all of the items. Then apply 4 or 5 coats of spray-on shellac to the inside, ensuring to tape off the miters so that they don’t get end on them.

Glue the field collectively utilizing blue tape on the miters and trapping the underside. Reinforce the stress with band clamps, and glue within the divider.

After a pair hours, take away the clamps and blue tape and prep the surface partitions of the field. A lightweight sanding or a number of passes with a pointy airplane will do the trick. Then, with a block airplane, put a heavy chamfer across the backside fringe of the chessboard and the highest exterior fringe of the field. Ensure the chamfers are sizable, as they’ll act as a finger pull to take away the board from the field.
 |
 |
Magnets join board to field
 |
 |

Now we’ve come to the aforementioned bother with strong wooden chessboards—they transfer. Whereas there are innumerable methods to take care of this motion, one exceedingly easy means is to make use of magnets to connect the board to the field.


Begin with the field. Mark a centerline on the highest fringe of the 2 partitions which might be dadoed. Measure away from the middle in each instructions and mark for the magnets. You possibly can switch these places to the chessboard by tapping in tiny brads, trimming off the heads, and urgent the chessboard to the field to create small indentations. Drill holes simply as deep as your uncommon earth magnets are thick. If all the pieces aligns, give your board a closing sanding and glue the magnets in place.

Making use of end
Shellac is a superb alternative for this sort of venture, as is a wipe-on poly. I pad on 4 to 5 coats of shellac, buffing with metal wool between coats, after which I end with a coat of wax.
Erik Curtis is a woodworker in Philadelphia.

Positive Woodworking Beneficial Merchandise
Suizan Japanese Pull Noticed
A flexible noticed that can be utilized for something from kumiko to dovetails. Mike Pekovich recommends them as a woodworker’s first handsaw.
Join eletters at present and get the most recent strategies and how-to from Positive Woodworking, plus particular provides.
")

")


")
