


Not all woodworking is about superb furnishings. Typically it’s about necessary furnishings—the items that maintain household historical past. That’s the case with a set of chairs handed down from my great-grandparents. Structurally compromised however wealthy in heritage, these chairs deserved greater than only a restore—they deserved considerate preservation.
After my brother and I fastidiously disassembled the free chair joints and reassembled them with versatile epoxy, it was time to do one thing in regards to the horrible rubber suggestions my mother and father placed on the chairs to guard their flooring. I understand my mother and father have been pleased with their kitchen renovation and wished to maintain the ground wanting new so long as potential, however the rubber suggestions would fall off of a minimum of one leg anytime a chair was moved, leaving it to wobble on three uneven legs. My mother and father deserved higher than this! It was time to use good leather-based pads to the chairs that not solely would defend the ground however wouldn’t injury the ground if and once they wore away.
This method was taught to me by Jeff Lefkowitz throughout a Boggs side-chair class in 2017, and I’ve used it completely since. In the event you’re a chair fanatic, you MUST try his weblog for a monstrous quantity of chair-building goodness.
Why Not Use Retailer-Purchased Pads?
Earlier than we dive into the method, let’s handle why these plastic or adhesive felt pads simply don’t lower it:
- Plastic nail-in pads ultimately put on down, exposing the nail and scraping the ground—defeating their objective.
- Adhesive felt pads typically peel off, leaving a sticky residue and coming free with time and friction.
- Each choices compromise each aesthetics and performance.
- Leather-based pads, glued with cover glue, are the right various: delicate, sturdy, and simply replaceable.
Supplies and Instruments Wanted
- Full-grain leather-based (scrap leather-based works nice)
- Liquid cover glue (Previous Brown Glue is a superb choice)
- Leather-based punch or ¾-in. spherical cutter
- Blue tape
Steps
1. Put together the leather-based
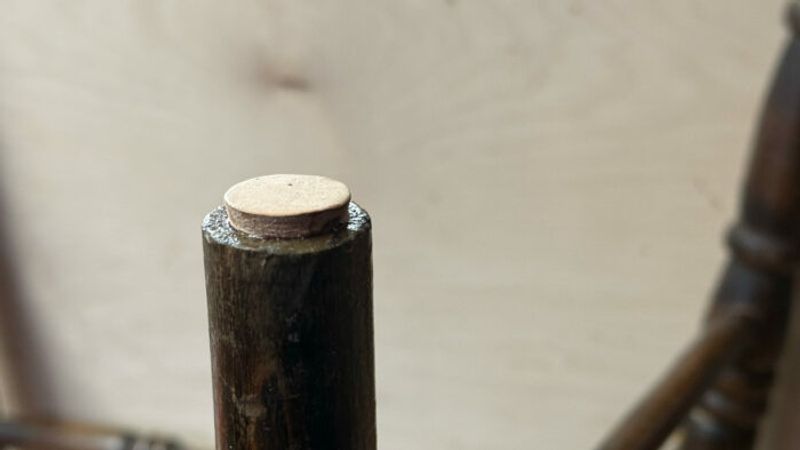
Begin by portray the again aspect of your leather-based sheet with liquid cover glue. Let it dry fully—this “primes” the leather-based, making certain a robust bond later.
2. Punch the leather-based disks
Use a ¾-in. spherical leather-based punch to chop out disks out of your primed leather-based sheet. These would be the pads that go on the underside of every chair leg. Punch out extras. I hold a small field stuffed with precut leather-based pads readily available, prepared to be used.
3. Prime the chair legs with cover glue
If it’s an outdated chair, calmly sand or rasp the contact floor earlier than priming the wooden—particularly if it has a end on it. Brush a coat of liquid cover glue onto the underside of every chair leg; this primes the wooden the identical means we primed the leather-based. Let it dry totally earlier than shifting on.
4. Apply and reactivate the glue
As soon as each the leather-based and the wooden are dry, apply one other gentle coat of cover glue to each the leather-based pad and the chair leg. This reactivates the glue. Press the leather-based pad firmly onto the leg backside and safe with tape. Go away it taped for a number of hours (or in a single day, ideally).
Outcomes and Longevity
The leather-based pads keep on for years, even below heavy use. We now have chairs from 2017 which are nonetheless going sturdy with the unique leather-based pads intact. Plus, they give the impression of being nice—delicate, understated, and much more in line with hand-built or vintage furnishings than mass-produced alternate options.
In the event you’re interested in the way to totally disassemble and restore an outdated chair, let me know within the feedback. I’ve restored dozens and can be completely satisfied to stroll via that course of in a future publish.

Join eletters right this moment and get the most recent strategies and how-to from High quality Woodworking, plus particular presents.
")

")


")
