


Revealing only a small brass knuckle to the viewer, the knife hinge is the least obtrusive sort of hinge {hardware} for advantageous furnishings. It’s additionally probably the most sturdy sort.
Knife hinges enable a door to open absolutely, whether or not it overlays the perimeters of the cupboard or is inset between them. To permit that performance, there are two sorts of knife hinges: straight and offset. I’ll present you right here easy methods to set up the straight sort, for overlay doorways. For putting in the offset knife hinge, which is used with inset doorways.
|
|
|


Router template makes set up straightforward


You is perhaps questioning, “If knife hinges are so nice, why aren’t they used extra usually?” The reply is that structure and set up will be tough. The answer is to make a router template that’s the actual measurement of the hinge leaves, and use it with a bearing-guided bit.
Dry-fit the case earlier than putting in the hinges
To make structure and routing simpler, you’ll have to have the case made and dry-fit, however not but glued collectively. That method you’ll know precisely the place to find the hinges. You’ll use the identical hinge template on the door that you simply use on the case, guaranteeing matching mortises. As soon as the mortises are reduce, you may glue up the case and simply set up the door and its hinges.
Depart the door a bit of outsized
You may make the door now too, however go away it 1/8 in. oversize in top and width to permit some room for exact becoming as soon as the case is glued up.
Making the template
|
|
|
|
|
|


To make sure an ideal opening within the heart of the template, I make it from a chunk of hardwood that I reduce into items and glue again collectively (see the drawings and photographs on the other web page). The template has a detachable fence that’s used when routing the door. As a result of the underside and high of the case overhang the perimeters and door on this cupboard—a well-liked method—the fence has to return off when routing the mortises within the case, and the template is aligned with pencil marks as an alternative.
I take advantage of the template with Amana’s No. 45475 3/8-in.-dia. flush-trim bit. As with many bearing-guided bits, there’s a slight offset between the bearing diameters and chopping diameters. It’s simply 0.007 in., however that’s sufficient to provide an undersize mortise. So it’s best to consider that offset when making the template. After gluing up the template, run it by the planer to flatten each faces.
Construct the Template in Items

Begin with a 1111⁄1616-in.-thick board, milled flat and straight, roughly 8 in. extensive by 1211⁄22 in. lengthy. Rip it in half, after which rip a strip off one half. The fence will register the template on the door for routing its hinge mortises.
|
|
|
|
|
|


Make a check reduce
Prior to installing its fence, clamp the template to a chunk of scrap, load your sample bit in your plunge router, and make a check reduce to see if the jig cuts an correct hinge mortise with no gaps. If there’s a downside at this stage, it’s straightforward to make one other template. That is additionally the very best time to dial within the depth of the mortise and set the plunge cease in your router.
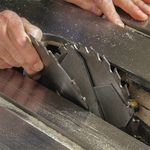
Sawdust can pile up contained in the mortise as you narrow it, stopping the router bearing from registering correctly in opposition to the template opening. So make one go at full depth, vacuum out the chips, after which make a second go.
You’ll have to chisel one finish of the mortise sq. to suit the sq. finish of the hinge leaf. Then the hinge ought to push in simply with none vital gaps.
|
|
|
|


Add the fence
You need the hinge to finish up centered on the thickness of the door, so you want to do a little bit of math to resolve the place the fence must be positioned. To align the fence and make it straightforward to connect and detach precisely, reduce a groove within the template and a tongue on the fence to suit. Place the groove so the fence face finally ends up a bit too near the hinge opening within the template, after which airplane the fence till the offset is precisely proper.

|
|
|
|


Mortise the case earlier than meeting
|
|
|
|
|
|
|
|


After chopping the cupboard joinery, dry-fit the case, and lay out the hinge places utilizing a setup block just like the one proven within the photographs. The block is produced from a strip of wooden that’s equal to the thickness of the door, with hinge mortises reduce into it.
Use your routing template to chop hinge mortises within the setup block. Then use the setup block and a few double-stick tape, as proven within the photographs, to position a hinge leaf on the underside of the case. Tape a shim to the entrance fringe of the case, an identical in thickness to the specified hole behind the door, and place the setup block in opposition to it to find the hinges. As soon as the hinge leaf is taped in place, hint round it with a pointy pencil, after which take away it.
To mark the hinge location on the highest of the case, use the mortise you narrow within the reverse finish of the setup block. Be sure you orient the identical facet of the block towards the entrance of the case so the hinges shall be set again the identical quantity.
Disassemble the case, and use your structure traces to align the router template on the underside and high of the cupboard. After routing the mortises, sq. one finish of every with a chisel, check the match of the hinges, and drill pilot holes for the screws.
|
|
 |
|
|
|
|


Glue up the case and match the door to it (partially)

If you end up pleased with how the case leaves match into their mortises, glue up the case. We’re capturing for tight gaps across the completed door, so that you need the case to be assembled as squarely as doable. With the case glued collectively, you may match the door to it, a minimum of alongside three edges. Finally you need this overlay door’s sides to be flush with the surface faces of the cupboard, and also you need 1/32-in. gaps between the door and the case high and backside.
Observe that the hinges have a small washer of kinds included in them, which determines the hole between the underside of the door and the case. As a result of this decrease hole is predetermined, you wish to match the hole above the door to it.
Begin the becoming course of on the high and backside fringe of the door, working towards that tight, even 1/32-in. hole above and under. I take advantage of a crosscut sled on the desk noticed to get the door near closing measurement, after which fine-tune it with a hand airplane.

Now sit the door on its backside edge within the case opening. Mark after which trim/airplane the hinge edge till it traces up with the surface of the case. The door ought to nonetheless be a tad extensive alongside the latch facet, which you’ll be able to tune up after the hinges are absolutely put in.
Rout the door mortises
 |
 |
|
|

The fence goes again on the hinge template for this step, to align it entrance to again on the sting of the door. That leaves only a small structure step to do—positioning the hinge accurately facet to facet. On the highest and backside edges of the door, knife a small mark 1-9/16 in. from the tip. That’s the place the tip of the template opening goes once you clamp it to the door.
Now you may rout the mortises within the high and backside edges, utilizing the identical depth setting in your router that you simply’ve used this entire time. Sq. up the mortise ends as earlier than, verify the match and placement of the hinge leaves, and drill pilot holes.
The Brusso hinges include one metal screw for chopping threads within the pilot holes, which makes it simpler to drive the tender brass screws with out deforming their heads or breaking the screws completely. Waxing the screws earlier than driving them additionally helps.
Door goes on in minutes
|
|
|
|


Start by screwing the case components of the hinges into their mortises. Now it’s best to be capable to tilt the door onto the underside hinge put up, push the highest door hinge onto its put up, after which pivot the door to push its mortise onto the higher hinge. Alternately, you may go away each door leaves unattached, place them over the posts within the case components of the hinges, after which slide the door onto each of its hinges without delay.
To screw the final door hinge leaf in place (or each door leaves), all it’s a must to do is open the door to entry the screws.
When you perceive how straightforward it’s to put in straight hinges for overlay doorways, you’ll haven’t any downside putting in the offset model, used on inset doorways.

Positive Woodworking Advisable Merchandise
Freud Tremendous Dado Noticed Blade Set 8″ x 5/8″ Bore
Leaves a dado with a flat backside and even performs glorious on plywood and melamine.

Leigh D4R Professional
The D4R Professional is Leigh’s flagship jig. Like the opposite Leigh jigs in our check, it represents a distinct world of high quality, from its clear, complete directions to its ingenious engineering, impeccable manufacturing, and unmatched capabilities.
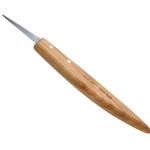
Pfiel Chip Carving Knife
Nice to make use of as a marking knife for laying out joinery and straightforward to sharpen.
Join eletters right now and get the most recent methods and how-to from Positive Woodworking, plus particular gives.
Obtain FREE PDF
once you enter your e mail deal with under.
")

")


")
