


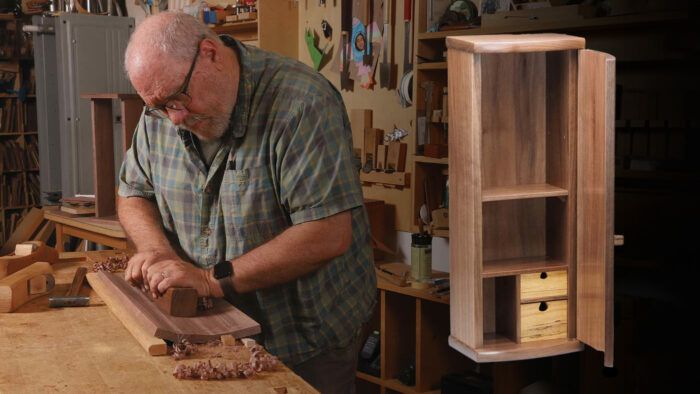
A few years in the past, I made my first coopered-door cupboard whereas finding out furnishings making with James Krenov on the School of the Redwoods (now the Krenov College) in California. The coopering course of Krenov taught—utilizing hand planes we had made ourselves to bevel the staves and to honest the curves on each faces of the door—was an excellent match for me, a really hands-on, intuitive method of working that resulted in a door that takes an asymmetrical curve, a dynamic and private form reasonably than a mechanical arc.
Years later, whereas passing alongside Krenov’s coopering method and his strategy to furnishings making to my spouse, Mami, who educated as a furnishings maker in Japan, I arrived on the design of this petite wall cupboard. Educating it to her required me to place the making course of into clear phrases, describing the how and particularly the why out loud. Though the cupboard is small, it’s not particularly fiddley, and it introduces a stunning variety of expertise. Rebuilding the piece once more now has recalled for me the significance of maintaining steps in sequence whereas additionally leaving room for adjustments or concepts that emerge as you’re employed.

The door is decisive

A cupboard’s case is normally made earlier than its door. However right here the curved door is the place to begin for each the design and the development. Making the door first means that you can draw a curved line you want—and a coopered door to match—with out being restricted by current cupboard dimensions. Working this manner additionally permits you to reply extra flexibly to the grain in your plank.

I selected an 8/4 walnut board for this challenge. The door is the focus, so I selected the perfect a part of the plank for the door. I wished a balanced sample of pretty straight grain, a sample that might be sawn into staves after which reassembled with out being enormously disturbed, and one that might make a visually clean transition from the door to the cupboard sides.

When separating a board into staves and aiming for invisible joints after it’s reassembled, riftsawn or quartersawn grain is mostly finest. I keep away from flatsawn grain with outstanding cathedral patterns, that are very tough to reassemble in a plausible method. I additionally keep away from interrupting shifts in coloration that may make reassembling arduous to drag off. I milled a clean for the door a number of inches wider and longer than I believed the completed door can be, and about 1/8 in. thicker.
Draw the curve of the door utilizing a skinny wooden batten. I drew an accelerating curve reasonably than a real arc. The curve determines the width of the staves to be reduce from the door clean. The tighter the curve, the narrower the staves. For a door like mine that follows an asymmetrical curve, the width of the staves will differ, as will the bevel angles.
Bevels and curves

I exploit hand planes to barely bevel the lengthy edges of the staves in order that when every pair is squeezed collectively, it intently matches the drawn curve. I desire to make use of my shopmade picket hand planes for this. These planes put my arms very near the work floor, and I’m capable of really feel the outcomes of any refined adjustments which might be occurring throughout a go. One aircraft is ready to chop barely deeper, and I exploit it to determine the bevels. A second aircraft, set for a finer reduce, takes the ultimate couple of passes, sitting on the bevel created by the primary aircraft.

Each planes have their blade set parallel with the aircraft’s sole. The beveling is completed by tipping the aircraft very barely to 1 aspect throughout every go, or by maintaining the aircraft flat on the stave’s edge however with most of its mass overhanging one aspect, which is able to end in taking a barely thicker shaving on that aspect.

Once you’re proud of the joints, edge-glue the staves as proven within the pictures beneath:


Clear the coopered curves

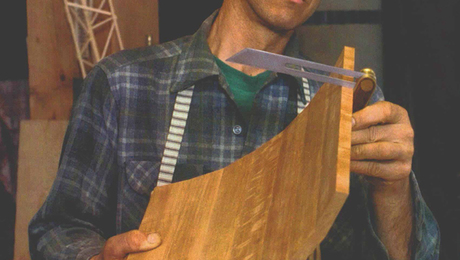
To honest the within of the door, I exploit a shopmade round-bottomed aircraft. Early on, with fairly a little bit of shaping to do, I aircraft with the blade set heavy. As soon as the concave floor appears properly curved and honest, I again out the blade for a lighter reduce and refine the floor.

The door’s convex aspect is faired with a flat-bottomed aircraft. Begin by planing the beveled joint areas, then work the highs and lows right into a clean curve. Not a lot materials is faraway from the door’s thickness when coopering utilizing these methods.
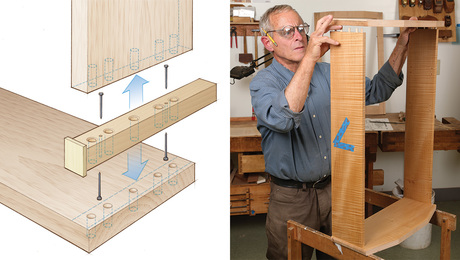
Making the case
As Krenov did, I selected dowel joinery for the cupboard building. There are seven 1/4-in. dowel pins in every nook of the cupboard. When executed precisely, these joints are very sturdy. Utilizing dowel-pin joinery—as a substitute of dovetails, for instance—means that you can inset the perimeters from the case prime and backside, opening the door for inventive particulars. Similar to dovetail or mortise-and-tenon joinery, dowel-pin joinery must be performed exactly and with care.
The method begins with a customized doweling jig. It’s easy and fast to make—only a brief stick of hardwood with a cap of 1/8-in. plywood tacked on one finish. The plywood overhangs the stick and serves to register the jig on the workpieces. The holes within the jig should be very correct, so use a drill press to chop them.

For drilling into the endgrain of the case sides, the jig is positioned flush to the within face of the workpiece and glued with brads. As a result of the dowel holes within the case prime and backside are inset, I made a cleated MDF spacer to find the dowel jig. Merely heart the spacer on the workpiece after which register the dowel jig in opposition to one aspect of the spacer after which the opposite.
 |
 |
The cupboard is dry-assembled and disassembled fairly a couple of occasions because it’s being constructed, so till remaining glue-up I exploit simply two dowel pins in every joint. When the time comes for the precise glue-up, these momentary dowel pins are discarded and a full set of recent pins replaces them. Take the time to trace down dowel pins that match very snugly. I exploit 1/4-in. pins from Lee Valley. I’ve discovered others typically have been undersized.
Splines for the dividers
 |
 |
| Groove the dividers. To chop spline grooves within the dividers, use the identical bit on the router desk that you just used within the handheld router, and make the grooves stopped on the entrance. | |
 |
|
| Make a spline clean 1⁄8 in. thick and 4 in. or so huge, with the grain working alongside its size. It will make for sturdy splines with no motion points. Minimize particular person splines from the clean with a handsaw. |
The splines get glued into their dividers earlier than remaining cupboard meeting. To ease insertion, barely chamfer the sides of the spline and the spline groove with some 150-grit sandpaper wrapped round a small block. |


Becoming the door

With the case dry-assembled, trim the door on the desk noticed to only over remaining width, then reduce it for a decent slot in peak. I exploit a taking pictures board to sq. the underside of the door, then shoot the highest edge till it simply matches. Set the door in place and examine for any wind or twist. If want be, aircraft slightly extra off reverse inside corners of the door till it closes tight to each case sides.
 |
 |
Subsequent, set up the knife hinges. Doing so earlier than the case is glued up permits you to mark for the case leaves with the case dry-fit after which disassemble to rout and chisel the mortises within the case prime and backside. (For a full rationalization of knife-hinge set up, see “Knife Hinges Made Simple” by Chris Gochnour, FWW #318.) The one distinction between mounting knife hinges in a typical overlay door and this curved one is that right here the case leaf will likely be set on an angle that mirrors the curve of the case’s entrance edge.

A carved door pull was at all times a particular element on a Krenov cupboard. The mortise for the pull may be made with a small router and a 1/8-in. router bit. Because the door is curved, double-stick tape a spacer strip to the door, making a platform for the router to experience on.
To make the pull, mill a chunk of hardwood to about 3/8 in. thick, 7/8 in. huge, and 9 in. lengthy; a protracted clean is less complicated and safer to work with. On each ends of the stick, reduce a tenon to suit the mortise within the door. Having a tenon at every finish offers you the choice to make a second pull if you’re sad with the primary one.

Carve as a lot of the pull form as doable whereas the stick is lengthy. Then reduce the pull off the persist with a handsaw and full the carving. For the final little bit of carving, I maintain the tenon in a small vise.
Door meets cupboard


 |
 |
Cupboard glue-up

Earlier than you glue up the case, make it possible for all surfaces have been hand planed (or sanded), the corners have been eased, and shellac and wax have been utilized (besides within the drawer pockets). Disguise glue, with its lengthy working time and reversibility, is a wonderful selection. I exploit Previous Brown Glue, which may be very straightforward to work with.
Assemble the cupboard utilizing a mallet, sturdy clamps, and padded cauls. Clamp tight, and examine for squareness, barely readjusting the clamps if it’s out of sq.. I clear up any glue squeeze-out with a aircraft blade after the glue dries; for the reason that cupboard was completed beforehand, the dried glue comes off simply.
For the again of the cupboard, I glued up a panel with a 1/4-in. Baltic birch core and shop-sawn walnut face veneers.
The again edges of the cupboard is probably not fully flush after the glue-up. With the door eliminated, place the cupboard face down on a padded floor, and use a protracted aircraft to even up the again edges of the perimeters, prime, and backside. Airplane the again panel to suit after which, after masking off its edges, apply shellac and wax. Then glue it in, utilizing only a small quantity of glue alongside the sides of the rabbets. Light-weight clamps and padded cauls will assist to guard the again panel.
To hold the cupboard, I made my very own keyhole {hardware} out of brass bar inventory. The method is straightforward: Utilizing drill bits of various sizes, drill two holes to create the highest and backside of the keyhole slot. A file removes the waste materials between them to create the keyhole form. Drill and countersink mounting holes for small brass screws. Mortise the hangers into the again of the cupboard, and deepen the mortise barely on the heart to accommodate the top of the wall anchor bolt.
Craig Vandall Stevens is this system director and first trainer at Philadelphia Furnishings Workshop.

Fantastic Woodworking Really helpful Merchandise

Blum Drawer Entrance Adjuster Marking Template
This template acts as a “dowel heart” for punching a gap to mark the place to drill fro clearance holes.
Join eletters at present and get the most recent methods and how-to from Fantastic Woodworking, plus particular gives.
")

")


")
