


Miters could also be among the many easiest of joints, however making them completely is an train in endurance and care from starting to finish. Reducing the miters is simply a part of the duty. Gluing them up cleanly is its personal hurdle, because the joint is vulnerable to slipping and sliding below clamps, and getting clamping strain sq. throughout the joint isn’t so simple as simply tightening a clamp.
The important thing to success in gluing up the joint is to use strain straight throughout the miter with out letting it transfer misplaced. I glue up mitered packing containers and casework utilizing three approaches: tape, band clamps, or glued-on clamping blocks. Which one I decide depends upon the scale of the workpiece and on whether or not there are 4 miter joints, as in a field, or fewer, as on a waterfall desk.
Tape for small components

Let’s begin with tape, the best technique. I favor blue tape; others use packing tape. Each work superbly on small packing containers. I begin by lining up all 4 sides of the field, exterior face up, alongside a straightedge. Working from one finish to the opposite, I apply blue tape to a few of the miter joints. I exploit two fingers to drag the joint collectively whereas stretching tape throughout the seam. I can then flip all the meeting over and run a bead of glue close to the tip of every of the miters.
|
|
|
|


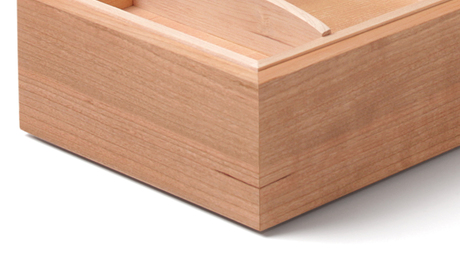
The blue tape acts as a hinge and a clamp when gluing up. Once I fold the field up and pull tape throughout the final nook, all of the miters keep closed because the glue dries. I attempt to apply sufficient clamping strain to get a little bit of glue squeeze-out. This ensures a pleasant, tight joint.

Band clamps

The one subject with blue tape is that it is probably not sturdy sufficient by itself for midsize and huge functions, like cabinetwork. For heavier materials at a bigger scale, extra clamping strain is required. That is the place band clamps are helpful. A band clamp acts as a large rubber band that places equal strain on all 4 corners. Its metal or plastic corners distribute strain evenly across the case and shut bigger miters.
 |
 |
I arrange my miters utilizing the identical blue tape technique, this time to align the components and maintain them in place whereas I apply the band clamps. As soon as the band clamps are in place, I ratchet them sufficient to see glue squeeze-out. You might be able to get away with utilizing one band clamp for slender packing containers, however I discover that if a challenge is sufficiently big to require band clamps, I normally want a couple of.

Clamping blocks


A clamping block is nothing greater than a chunk of wooden quickly glued onto the workpiece that permits me to get perpendicular clamping strain throughout the miter joint. The inventory for the block is ripped with the blade at 45º, complementary to the miter’s 45º, to permit for sq. clamping strain. Dimension the blocks to provide your clamps sufficient room to seize.
I glue a chunk of paper between the clamping block and the workpiece. This paper joint gives the shear energy crucial for tightening the clamps, however it can break away with a number of gentle faucets of a chisel. The paper left on the workpiece is well eliminated afterward.
 |
 |
| Tape the joint. Use strips of blue tape to align the miter for clamping. Apply glue and shut the joint to unfold it. It’s the identical technique as with smaller miters, simply with extra glue. | |
Helpful L-bracket

For bigger mitered assemblies the place guaranteeing squareness is troublesome, I make L-shaped brackets out of MDF to carry components at 90º. These helpful brackets may be clamped on as soon as the joints are closed and left on till the glue is dry. I create a bit reduction on the exterior nook of the L to keep away from gluing it to my piece.

 |
 |
| Take away the cauls and paper. A few gentle faucets with a chisel must be sufficient to pry free and cut up away the clamping caul. After that, you may shortly airplane, scrape, or sand away the paper. | |
—FWW ambassador Erik Curtis makes furnishings in Philadelphia.

Join eletters at present and get the most recent methods and how-to from Tremendous Woodworking, plus particular gives.
Obtain FREE PDF
whenever you enter your e mail deal with beneath.
")

")


")
